
Imagine stepping into your backyard and instantly feeling transported to the sun-drenched hills of Tuscany—where terracotta pots brim with fragrant herbs, olive trees whisper in the breeze, and the symmetry of stone pathways leads to a hidden fountain. Italian backyard gardens are more than just a landscaping trend; they’re a timeless escape that blends Old World elegance with relaxed Mediterranean vibes. Whether you have a sprawling yard or a compact urban space, these gardens thrive on balance, simplicity, and a touch of rustic romance.
But here’s the best part: you don’t need a villa-sized budget to create this paradise. By focusing on affordable materials like gravel, recycled stone, and drought-tolerant plants (hello, lavender and rosemary!), you can craft a slice of Italy right outside your door. Think weathered terracotta pots filled with vibrant blooms, DIY water features that mimic Renaissance fountains, and climbing vines like bougainvillea that add drama without the cost.
In this guide, we’ll explore 10 budget-friendly ideas to transform your backyard into a Mediterranean sanctuary. From small-space solutions like vertical herb gardens to thrifty hardscaping hacks, you’ll learn how to prioritize elegance over expense. Ready to trade ordinary for la dolce vita? Let’s dig in.
Core Principles of Budget-Friendly Italian Garden Design
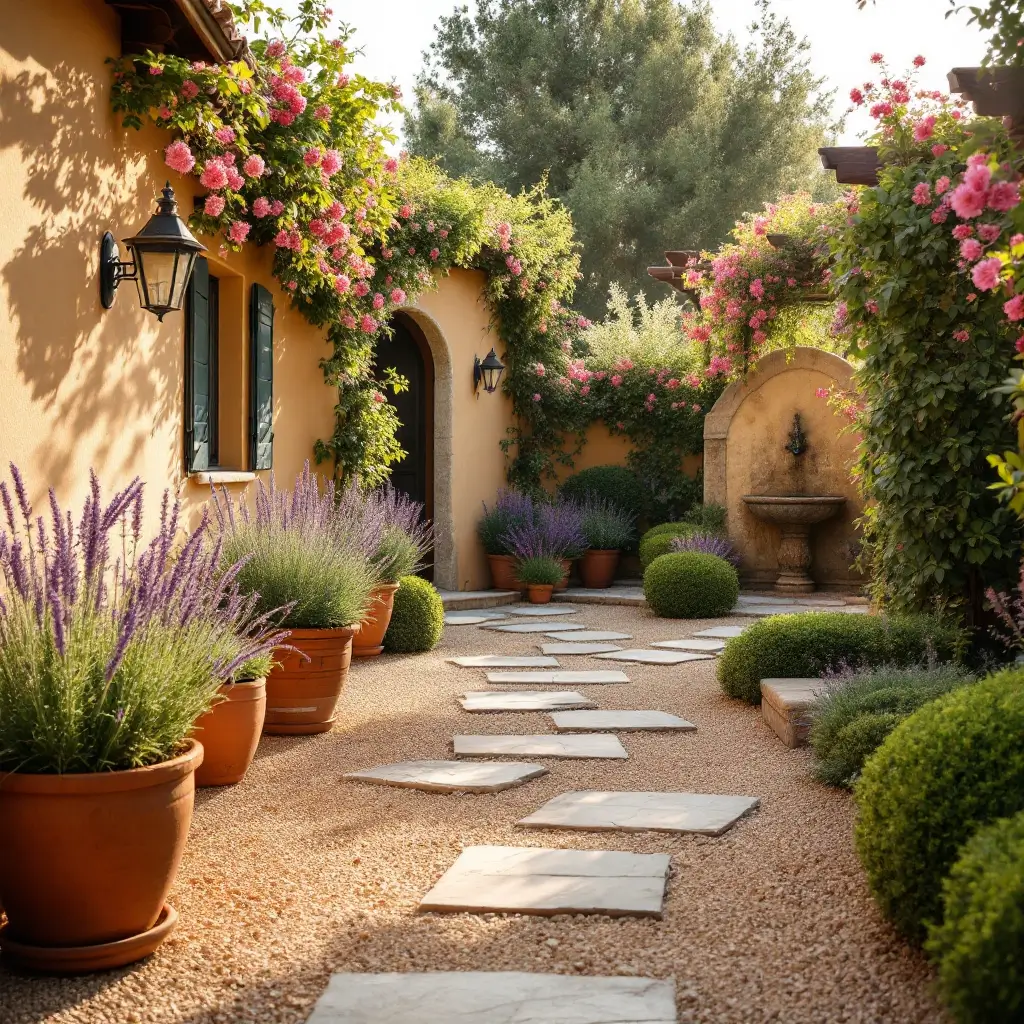
Embrace Symmetry (Affordable Layouts with Gravel Paths & Hedges)
Symmetry is the heartbeat of Italian garden design, evoking the harmony of Renaissance villas and the structured elegance of Tuscan landscapes. But achieving this balance doesn’t require a landscaper’s budget—just smart planning and thrifty materials. Here’s how to create symmetry affordably:
1. Start with a Central Axis
- Why it works: A central gravel path or walkway instantly creates visual balance.
- Budget-friendly tips:
- Use crushed gravel (cheaper than flagstone) in warm, Mediterranean tones like golden tan or terra-cotta.
- Edge paths with recycled bricks or salvaged stones for a polished look.
- Add DIY stepping stones (concrete molds or repurposed pavers) for focal points.
- Pair with plants: Flank the path with low boxwood hedges or dwarf rosemary—both affordable, evergreen, and easy to trim.
2. Frame Spaces with Hedges
- Affordable hedge options:
- Boxwood: Buy small starter plants and space them 12–18″ apart; they’ll fill in over time.
- Lavender: Double as a fragrant, drought-tolerant border.
- Rosemary: Thrives in poor soil and adds texture (and fresh herbs for cooking!).
- Symmetry hack: Use geometric shapes (squares, circles) for hedge beds. For small yards, create symmetry with potted hedges in matching terracotta planters.
3. Gravel Paths: The Budget Backbone
- Why gravel?:
- Costs 80% less than poured concrete.
- Easy to install DIY (no professional help needed).
- Perfect for defining zones (e.g., a central path splitting herb gardens and seating areas).
- Step-by-step gravel path:
- Mark your path with stakes and string.
- Dig 2–3″ deep and line with landscape fabric (prevents weeds).
- Fill with gravel and compact with a tamper.
- Pro tip: Mix gravel sizes (e.g., pea gravel for walkways, crushed stone for borders) to add texture without cost.
4. Balance with Repetition
- Mirror plantings: Place identical plants, pots, or ornaments on both sides of your axis.
- Example: Two olive trees in terracotta pots flanking a gravel path.
- Symmetrical focal points: Add matching elements like:
- DIY birdbaths (repurpose thrifted bowls on pedestals).
- Stone urns (shop secondhand stores or use concrete casts).
5. Small-Space Symmetry Solutions
- Vertical symmetry: Use wall-mounted trellises with identical climbing plants (e.g., jasmine or ivy).
- Tiered planters: Stacked pots or wooden crates with herbs arranged in mirrored patterns.
- Reflective surfaces: Place mirrors (outdoor-safe) strategically to mimic expansive symmetry.
Cost Breakdown Example
| Element | Budget Option | Approx Cost |
|---|---|---|
| Gravel Path | Crushed limestone (10′ x 3′) | 50–50–80 |
| Boxwood Hedges | 12 small plants (space 12″ apart) | 40–40–60 |
| Terracotta Pots | Secondhand finds (2 large pots) | 20–20–30 |
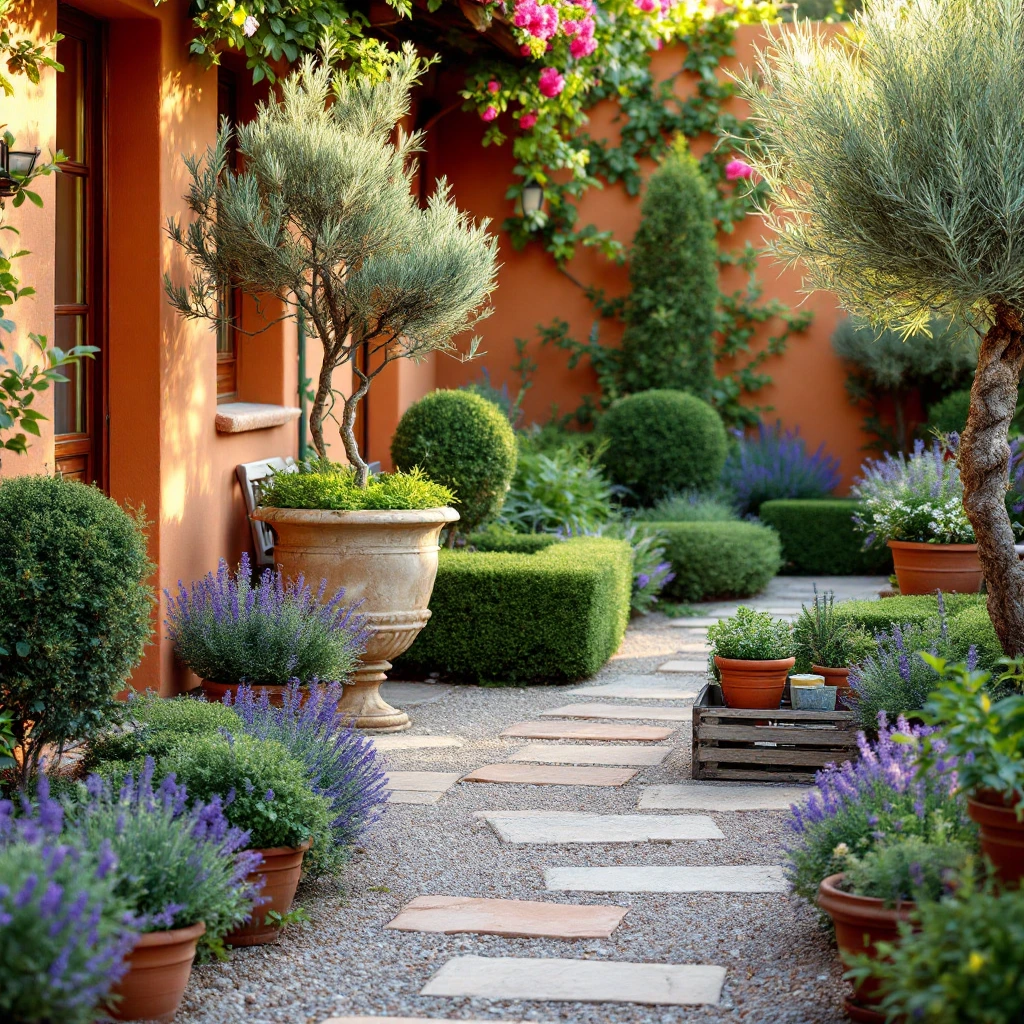
Thrifty Material Choices (Terracotta, Recycled Stone, Gravel)
Italian gardens are celebrated for their rustic elegance, but achieving that Old World charm doesn’t require splurging on premium materials. By leaning into timeless, budget-friendly staples like terracotta, recycled stone, and gravel, you can create a Mediterranean masterpiece without overspending. Here’s how to source, style, and save:
1. Terracotta on a Dime
- Why terracotta?: The warm, earthy tones of terracotta pots and tiles are quintessentially Italian. They age beautifully, developing a weathered patina that adds instant character.
- Budget sourcing tips:
- Secondhand treasures: Scout flea markets, Facebook Marketplace, or garage sales for chipped or faded pots (flaws add rustic charm!).
- DIY aging: Make new pots look antique by brushing them with yogurt (to encourage moss) or diluted paint for a weathered finish.
- Repurpose broken pieces: Use cracked pots as drainage layers in planters or create “spilled flower” displays in garden beds.
- Affordable alternatives:
- Concrete casts: DIY terracotta-look planters using silicone molds and quick-set concrete.
- Terra-cotta paint: Transform plastic pots with spray paint in burnt orange or ochre hues.
2. Recycled Stone: Salvage & Save
- Why recycled stone?: Natural stone is a hallmark of Italian gardens, but new materials can break the bank. Recycled stone offers the same durability and aesthetics at a fraction of the cost.
- Where to find it:
- Construction sites: Ask for leftover stone, bricks, or pavers from demolition projects (often free or deeply discounted).
- Landscaping suppliers: Many sell “seconds” (imperfect stones) or bulk recycled materials.
- Online classifieds: Search for terms like “free stone rubble” or “used flagstone.”
- Creative uses:
- Pathways: Lay irregular stones in a mosaic pattern for a rustic pietra dura effect.
- Retaining walls: Stack flat stones without mortar for a dry-stack look.
- Edging: Line garden beds with broken limestone or granite chunks.
3. Gravel: The Budget Backbone
- Why gravel?: Affordable, low-maintenance, and versatile, gravel mimics the loose, sunbaked textures of Mediterranean courtyards.
- Types to try:
- Pea gravel: Soft underfoot, perfect for seating areas (≈ 40–40–60 per ton).
- Crushed limestone: Crisp, light-colored, ideal for pathways (≈ 30–30–50 per ton).
- Decomposed granite: Compacts well for stable walkways (≈ 35–35–55 per ton).
- Installation hacks:
- Weed-proofing: Lay landscape fabric under gravel to prevent weeds.
- Mix and match: Combine gravel with recycled stone for texture contrast (e.g., gravel paths with stone borders).
- Color coordination: Choose warm tones (tan, gold, terra-cotta) to align with Italian garden aesthetics.
4. Pro Tips for Maximizing Savings
- Bulk buying: Purchase gravel or stone in bulk (by the ton) for discounts.
- Team up with neighbors: Split material costs for larger orders.
- Salvage yard gems: Look for discarded wrought iron gates, stone birdbaths, or broken statues to repurpose as garden art.
Cost Comparison Table
| Material | New Price | Thrifty Alternative | Savings |
|---|---|---|---|
| Terracotta Pots | 50–50–100 (large) | Secondhand + DIY aging: 10–10–20 | Up to 80% off |
| Flagstone Pathways | 500–500–800 (10′ x 4′) | Recycled stone: 100–100–200 | 60–75% off |
| Gravel (per ton) | 50–50–100 | Bulk purchase: 30–30–70 | 30–40% off |
Design Ideas to Tie It All Together
- Terracotta accents: Cluster pots of varying sizes (stagger heights for visual interest) with herbs like basil and thyme.
- Stone-and-gravel combos: Create a central courtyard with a recycled stone fountain surrounded by gravel “river” pathways.
- Salvaged focal points: Use an old stone column as a planter base or a chipped urn as a bird feeder.
Mediterranean Color Palettes (Ochre, Sage, Terracotta on a Budget)
The magic of an Italian garden lies in its warm, earthy tones that mirror the rolling hills of Tuscany and the azure coasts of Sicily. By embracing a Mediterranean color palette—ochre, sage, terracotta, and weathered whites—you can transform even the simplest backyard into a timeless retreat. Best of all, these colors thrive on budget-friendly materials and clever DIY tricks. Here’s how to channel la dolce vita without splurging:
1. Ochre: The Golden Glow of Sunlit Villas
- Why ochre?: This warm, golden-yellow hue mimics aged stucco walls and Tuscan sunsets. It adds instant warmth and pairs beautifully with greenery.
- Budget-friendly applications:
- Paint an accent wall: Use outdoor-grade ochre paint (e.g., Behr’s “Tuscan Sun”) on a garden shed, fence, or pergola.
- Upcycle furniture: Refresh thrifted benches or tables with ochre spray paint.
- Textile accents: Add ochre throw pillows or outdoor rugs (check discount stores like HomeGoods).
- DIY hack: Mix natural clay with water to create a wash for terracotta pots or garden walls.
2. Sage: The Serenity of Mediterranean Herbs
- Why sage?: Soft, muted green tones evoke olive groves, rosemary bushes, and cypress trees. It balances ochre’s warmth and terracotta’s rusticity.
- Affordable ways to incorporate sage:
- Plants as decor: Grow sage-colored plants like lavender, rosemary, or dusty miller in thrifted pots.
- Painted details: Use sage-green paint on wooden planter boxes, trellises, or shutters.
- Fabric drapes: Hang sage outdoor curtains (use shower curtains for a budget hack) around a pergola or seating area.
- Pro tip: Pair sage with silver foliage plants (e.g., lamb’s ear) for contrast.
3. Terracotta: Rustic Charm on a Dime
- Why terracotta?: The burnt-orange tones of terracotta pots, tiles, and pathways are iconic in Italian gardens. They add texture and warmth.
- Budget sourcing ideas:
- Secondhand pots: Scout flea markets for chipped or faded terracotta (imperfections add character).
- DIY terracotta paint: Transform concrete planters or plastic pots with terracotta-hued spray paint.
- Broken tile mosaics: Use discarded terracotta tiles to create stepping stones or tabletop designs.
- Creative uses:
- Cluster terracotta pots of varying sizes for visual depth.
- Line pathways with terracotta shards as edging.
4. Weathered Whites & Creams: The Neutral Anchor
- Why whites?: Crisp whites and creamy neutrals (think limestone or aged plaster) balance bold Mediterranean hues and reflect sunlight.
- Budget touches:
- Whitewashed walls: Dilute white paint with water for a weathered stucco effect on fences or sheds.
- Salvaged limestone: Use broken pieces as edging or to create a faux ruins feature.
- Thrifted linens: Drape white tablecloths over outdoor tables or use muslin fabric as shade sails.
5. Combining Colors: Pro Tips for Harmony
- The 60-30-10 rule:
- 60% neutrals (whites, creams, gravel grays).
- 30% earthy tones (ochre, terracotta).
- 10% accents (sage greens, cobalt blues for pottery).
- Sample palette:
- Walls: Weathered white or ochre.
- Pathways: Terracotta pots + gravel in golden tan.
- Accents: Sage-green cushions, lavender blooms.
Budget-Friendly Plant Palette
| Color | Plants | Cost-Saving Tips |
|---|---|---|
| Ochre | Marigolds, Coreopsis | Grow from seed (2–2–5 per packet). |
| Sage | Lavender, Rosemary, Artemisia | Propagate cuttings from friends. |
| Terracotta | Red Hot Pokers, Sedum | Split perennials over time. |
DIY Project: Terracotta-Ochre Stepping Stones
- Materials: Quick-set concrete, ochre pigment powder, terracotta tile fragments.
- Steps:
- Mix concrete with ochre pigment for a sunbaked hue.
- Press terracotta shards into wet concrete molds.
- Seal with a matte outdoor sealant.
- Cost: ~15for6stonesvs.15for6stonesvs.50+ for store-bought.
Cost Breakdown: Mediterranean Color Makeover
| Element | Budget Approach | Cost |
|---|---|---|
| Ochre Accent Wall | DIY paint + labor | 30–30–50 |
| Sage Planters | Thrifted pots + spray paint | 10–10–20 |
| Terracotta Pathway | Salvaged tiles + gravel | 40–40–60 |
| Whitewashed Pergola | Diluted paint + brushes | 15–15–25 |
10 Affordable Mediterranean Plants for Italian Backyard Gardens
Drought-Tolerant Staples (Lavender, Rosemary, Olive Trees)
Italian gardens thrive in harmony with the Mediterranean climate, where dry summers and well-drained soils reign. By embracing drought-tolerant plants like lavender, rosemary, and olive trees, you can cultivate a lush, low-maintenance backyard oasis that’s both eco-friendly and budget-savvy. These plants aren’t just survivors—they’re stars of the Italian aesthetic, offering fragrance, structure, and timeless beauty.
1. Lavender: The Fragrant Workhorse
- Why it’s essential:
- Aromatic appeal: Fills the air with calming fragrance.
- Pollinator magnet: Attracts bees and butterflies.
- Versatility: Use as borders, hedges, or in pots.
- Budget-friendly tips:
- Grow from cuttings: Snip stems from existing plants (or ask neighbors!) and root them in sandy soil.
- Buy small: Opt for starter plants (3–3–5 each) over mature specimens.
- Dry for decor: Harvest blooms for sachets or wreaths, extending their value.
- Care basics:
- Soil: Well-draining, slightly alkaline (add lime if needed).
- Water: Deeply once every 2 weeks once established.
- Pruning: Trim back by ⅓ in spring to encourage bushy growth.
2. Rosemary: Culinary Charm and Structure
- Why it’s essential:
- Dual-purpose: Fresh herbs for cooking + evergreen structure.
- Architectural form: Upright varieties (e.g., Tuscan Blue) add vertical interest.
- Drought resilience: Thrives in poor, rocky soils.
- Budget-friendly tips:
- Propagate from cuttings: Root sprigs in water, then transplant.
- Multi-task: Use as a low hedge or topiary for formal flair.
- Care basics:
- Sun: Full sun (6+ hours daily).
- Water: Let soil dry completely between waterings.
- Pruning: Shape after flowering to prevent legginess.
3. Olive Trees: Timeless Mediterranean Icons
- Why they’re essential:
- Symbol of longevity: Gnarled trunks and silvery foliage evoke Tuscan groves.
- Focal points: Dwarf varieties (e.g., Little Ollie) suit small yards.
- Edible bonus: Harvest olives for curing (if climate allows).
- Budget-friendly tips:
- Buy young trees: A 3–4 ft. tree costs 40–40–80 vs. $300+ for mature specimens.
- Grow in pots: Use large terracotta containers to restrict size and move indoors in winter (for cold climates).
- Opt for non-fruiting varieties: Cheaper and lower-maintenance.
- Care basics:
- Soil: Gritty, well-draining mix (avoid heavy clay).
- Water: Deep soak every 3–4 weeks once established.
- Frost protection: Mulch heavily in winter or wrap trunks in burlap.
4. Design Ideas for a Cohesive Look
- Lavender borders: Line gravel paths with Hidcote lavender for a purple-blue edge.
- Rosemary hedges: Plant Prostratus rosemary to spill over stone walls.
- Potted olive trio: Cluster three dwarf olives in terracotta pots around a fountain.
- Companion plants: Pair with agave, sedum, or santolina for texture contrast.
Cost-Saving Comparison
| Plant | Starter Size Cost | Annual Water Savings | Long-Term Value |
|---|---|---|---|
| Lavender | 3–3–5 per plant | 50–70% vs. lawns | 5–10 years with proper care |
| Rosemary | 4–4–8 per plant | 60–80% vs. annuals | 10+ years (perennial) |
| Dwarf Olive Tree | 40–40–80 | 75% vs. thirsty shrubs | 20+ years (with winter care) |
Common Questions Answered
- “Can I grow olive trees in cold climates?”:
Yes! Choose cold-hardy varieties like Arbequina and grow in pots to bring indoors during winter. - “How to revive overwatered lavender?”:
Stop watering, improve drainage with sand/gravel, and trim rotten roots. - “Best rosemary for small spaces?”:
Prostratus (trailing) or Blue Boy (compact).
DIY Project: Lavender-Rosemary Herb Spiral
- Materials: Recycled bricks, gravel, compost, lavender/rosemary plants.
- Steps:
- Build a spiral mound with bricks.
- Fill with gravel (base) and compost (top).
- Plant lavender at the top (driest zone), rosemary mid-level.
- Cost: 20–20–30 vs. $100+ for store-bought planters.
Budget-Friendly Evergreens (Boxwood, Myrtle for Structure)
In Italian gardens, evergreens like boxwood and myrtle are the unsung heroes—providing year-round structure, defining symmetry, and evoking the clipped elegance of Renaissance villas. These plants are not only resilient but also surprisingly affordable when sourced and maintained strategically. Here’s how to use them to anchor your backyard design on a budget:
1. Boxwood: The Classic Italian Hedge
- Why boxwood?:
- Timeless appeal: Used for centuries in formal parterres and labyrinth gardens.
- Versatility: Perfect for low hedges, topiaries, or edging pathways.
- Slow growth: Reduces pruning frequency (saves time and effort).
- Budget sourcing tips:
- Buy small: Purchase 4–6″ starter plants (2–2–4 each) instead of mature shrubs.
- Propagate cuttings: Take 6″ cuttings in spring, dip in rooting hormone, and plant in sandy soil.
- Shop end-of-season sales: Nurseries discount plants in late fall.
- Cost-effective varieties:
- Buxus sempervirens ‘Suffruticosa’ (dwarf, ideal for edging).
- Green Velvet (cold-hardy and compact).
- Care basics:
- Soil: Well-draining, slightly alkaline (add crushed limestone if needed).
- Water: Deeply once a week during establishment; drought-tolerant once mature.
- Pruning: Trim 2–3 times yearly with hand shears (avoid electric trimmers to prevent leaf burn).
2. Myrtle: Fragrant, Flexible Foliage
- Why myrtle?:
- Mediterranean native: Thrives in dry, sunny climates.
- Aromatic leaves: Releases a citrusy scent when brushed.
- Adaptable form: Train as a hedge, topiary, or loose shrub.
- Budget-friendly strategies:
- Grow from seed: Harvest berries from existing plants and sow in fall.
- Divide existing plants: Split mature myrtles at the root ball in early spring.
- Use as filler: Plant between stone walls or gravel paths for softness.
- Top varieties:
- Myrtus communis (common myrtle, ideal for topiaries).
- Compacta (dwarf, suits small spaces).
- Care basics:
- Sun: Full sun to partial shade.
- Water: Moderate during first year; minimal once established.
- Pruning: Shape after flowering to encourage dense growth.
3. Design Ideas for Structure & Savings
- Boxwood parterre: Create a geometric herb garden with low boxwood borders (use recycled bricks for edging).
- Myrtle archway: Train myrtle over a DIY iron or wooden arch (source materials from salvage yards).
- Mixed evergreen border: Alternate boxwood and myrtle with lavender for texture contrast.
- Potted topiaries: Grow boxwood or myrtle in thrifted urns for movable focal points.
Cost Comparison: Mature vs. Budget Approaches
| Plant | Mature Hedge Cost (10 ft) | Budget Approach (10 ft) | Savings |
|---|---|---|---|
| Boxwood | 200–200–400 | Starter plants + 2-year growth | 150–150–300 |
| Myrtle | 150–150–300 | Propagated cuttings + patience | 120–120–250 |
DIY Project: Boxwood Hedge from Starter Plants
- Materials: 10–12 boxwood starters ($30 total), compost, mulch.
- Steps:
- Dig a trench 8″ deep.
- Space plants 12″ apart (closer for denser hedges).
- Backfill with compost, water deeply, and mulch.
- Timeline: Achieve a 2 ft hedge in 2–3 years.
- Cost: 50totalvs.50totalvs.300+ for mature plants.
Common Questions Answered
- “How to prevent boxwood blight on a budget?”:
- Avoid overhead watering, space plants for airflow, and spray with baking soda solution (1 tbsp/gallon water).
- “Can myrtle survive frost?”:
- Yes! Myrtus communis tolerates light frost; mulch roots in winter.
- “Alternatives to boxwood for humid climates?”:
- Use holly or dwarf yaupon holly for similar structure.
Edible Escapes (Lemon Trees, Herb Gardens in Containers)
Italian gardens aren’t just about visual charm—they’re a celebration of la dolce vita, where beauty and bounty coexist. Incorporating lemon trees and herb gardens in containers lets you savor the flavors of the Mediterranean while adding vibrant structure to your backyard. These edible elements thrive in pots, making them perfect for small spaces, renters, or anyone craving a slice of Tuscany without the villa price tag.
1. Lemon Trees: Sunshine in a Pot
Why they’re essential:
- Iconic Italian aesthetic: Glossy green leaves and golden fruit evoke Amalfi Coast charm.
- Versatility: Dwarf varieties (e.g., Meyer Lemon) thrive in containers and bear fruit year-round.
- Fragrance: Blossoms fill the air with a citrusy perfume.
Budget-friendly tips:
- Buy young trees: A 2–3 ft. dwarf lemon tree costs 30–30–50 (vs. $150+ for mature specimens).
- Use recycled containers: Repurpose whiskey barrels, galvanized tubs, or large terracotta pots.
- Overwinter indoors: In cold climates, move pots to a sunny window during frost months.
Care basics:
- Soil: Well-draining mix (1 part sand, 1 part potting soil, 1 part compost).
- Water: Keep soil moist but not soggy; water when the top 1″ feels dry.
- Fertilizer: Use citrus-specific feed monthly during growing season.
- Pruning: Trim dead branches and shape lightly in early spring.
2. Herb Gardens: Flavorful & Fragrant
Why they’re essential:
- Authentic Italian cooking: Basil, oregano, thyme, and rosemary are kitchen staples.
- Textural appeal: Soften hardscapes with trailing herbs like thyme or creeping rosemary.
- Low maintenance: Most Mediterranean herbs thrive on neglect and full sun.
Budget-friendly strategies:
- Start from seeds: A $2 packet yields dozens of plants (basil, parsley, oregano).
- Propagate cuttings: Snip supermarket herbs (e.g., mint, rosemary) and root them in water.
- Upcycle containers: Use colanders, tin cans, or wooden crates lined with burlap.
Top herbs for containers:
- Basil: Classic for pesto; pair with tomatoes in summer.
- Rosemary: Upright varieties (Tuscan Blue) add vertical interest.
- Thyme: Creeping types spill over edges for a lush look.
- Parsley: Biennial; grows well in partial shade.
3. Design Ideas for Edible Elegance
- Lemon tree focal point: Center a potted lemon tree on a gravel patio, surrounded by smaller herb pots.
- Herb spiral: Build a vertical spiral with recycled bricks, planting drought-tolerant herbs (thyme, oregano) at the top and moisture-loving basil at the base.
- Window box kitchen garden: Mount terracotta window boxes with basil, parsley, and chives for easy access.
- Citrus-and-herb duo: Pair lemon trees with pots of rosemary or sage for complementary fragrances.
Cost-Saving Comparison
| Element | Store-Bought Cost | DIY/Budget Approach | Savings |
|---|---|---|---|
| Dwarf Lemon Tree | 50–50–75 (3-gallon pot) | Buy 1-gallon sapling + grow | 20–20–40 |
| Herb Garden | 30–30–50 (pre-planted kit) | Seeds + recycled containers | 25–25–45 |
| Terracotta Pots | 15–15–30 each (new) | Thrifted/DIY-aged pots | 10–10–25 each |
DIY Project: Herb Container Trio
- Materials: 3 mismatched containers (tin cans, wooden boxes), drill (for drainage), soil, herb seeds/cuttings.
- Steps:
- Drill holes in containers.
- Paint exteriors with ochre or sage for cohesion.
- Plant basil (center), trailing thyme (edges), and rosemary (upright).
- Cost: 10–10–15 vs. $50+ for store-bought sets.
Common Questions Answered
- “Can I grow lemon trees indoors year-round?”:
Yes! Use grow lights in winter and keep humidity high with a pebble tray. - “How to prevent herbs from bolting?”:
Harvest frequently and pinch off flowers (except for pollinators). - “Best herbs for shady spots?”:
Parsley, mint, and chives tolerate partial shade.
Pro Tip: Preserve Your Bounty
- Freeze herbs: Chop basil or parsley, mix with olive oil, and freeze in ice cube trays.
- Dry citrus peels: Use zest in teas, cocktails, or DIY cleaning sprays.
DIY Italian Garden Decor & Hardscaping Ideas
Upcycled Terracotta Pots (Paint, Mosaic, Stacked Planters)
Transform ordinary terracotta pots into stunning Italian garden accents with these budget-friendly, creative techniques. Perfect for adding Mediterranean charm, these projects blend sustainability with style.
1. Painted Terracotta Pots: Mediterranean Hues & Patterns
Materials Needed:
- Cheap/free terracotta pots (thrifted, salvaged, or chipped)
- Outdoor acrylic paint (ochre, sage, terracotta, cobalt blue)
- Stencils, sponges, or brushes
- Clear sealant spray
Step-by-Step:
- Clean & Prep: Scrub pots with soapy water; let dry.
- Base Coat: Apply a solid color (e.g., ochre) for a weathered look.
- Add Designs: Use stencils for geometric patterns or freehand vines/lemons.
- Seal: Protect with UV-resistant sealant.
Pro Tips:
- Distressing: Sand edges for a rustic finish.
- Layering: Dab contrasting colors with a sponge for texture.
Budget Hack: Use leftover house paint or sample pots.
2. Mosaic Magic: Broken Tile & Dish Revival
Materials Needed:
- Broken tiles, china, or glass
- Tile adhesive, grout, gloves
- Safety goggles & tile nippers
Step-by-Step:
- Design Layout: Arrange shards on the pot (floral, geometric, or abstract).
- Adhere: Glue pieces with outdoor-rated adhesive.
- Grout: Fill gaps; wipe excess with a damp cloth.
- Cure: Let dry 24 hours.
Design Ideas:
- Italian Classics: Lemon motifs, vineyard vines, or cobalt patterns.
- Salvaged Style: Use mismatched china for a eclectic look.
Safety Note: Wear gloves and goggles when handling sharp edges.
3. Stacked Planters: Vertical Gardens for Small Spaces
Materials Needed:
- Multiple terracotta pots (varying sizes)
- Metal rod or rebar
- Drill (optional for drainage)
Step-by-Step:
- Drill Holes: Ensure drainage in each pot.
- Stack & Secure: Thread pots onto a rod, largest at the base.
- Plant: Fill with herbs (rosemary, thyme), succulents, or trailing ivy.
Pro Tips:
- Stability: Anchor the rod in a heavy base pot filled with gravel.
- Aesthetic Flow: Paint or mosaic the stacked pots for cohesion.
Plant Picks:
- Herbs: Compact and fragrant, perfect for kitchen gardens.
- Trailing Plants: String of pearls or creeping thyme for cascading beauty.
Budget & Sustainability Spotlight
- Cost Comparison:
- New Decorated Pot: 20–20–50 vs. Upcycled: 5–5–10.
- Eco-Perks: Reduces waste; repurposes broken items.
Maintenance Tips
- Painted Pots: Touch up chips annually; re-seal every 2 years.
- Mosaics: Re-grout if cracks appear.
- Stacked Planters: Check stability seasonally; rotate plants for even sun exposure.
Styling Your Italian Garden
- Groupings: Cluster painted pots near seating areas for pops of color.
- Focal Points: Place a mosaic pot as a centerpiece or flanking a fountain.
- Vertical Interest: Use stacked planters to frame doorways or pathways.
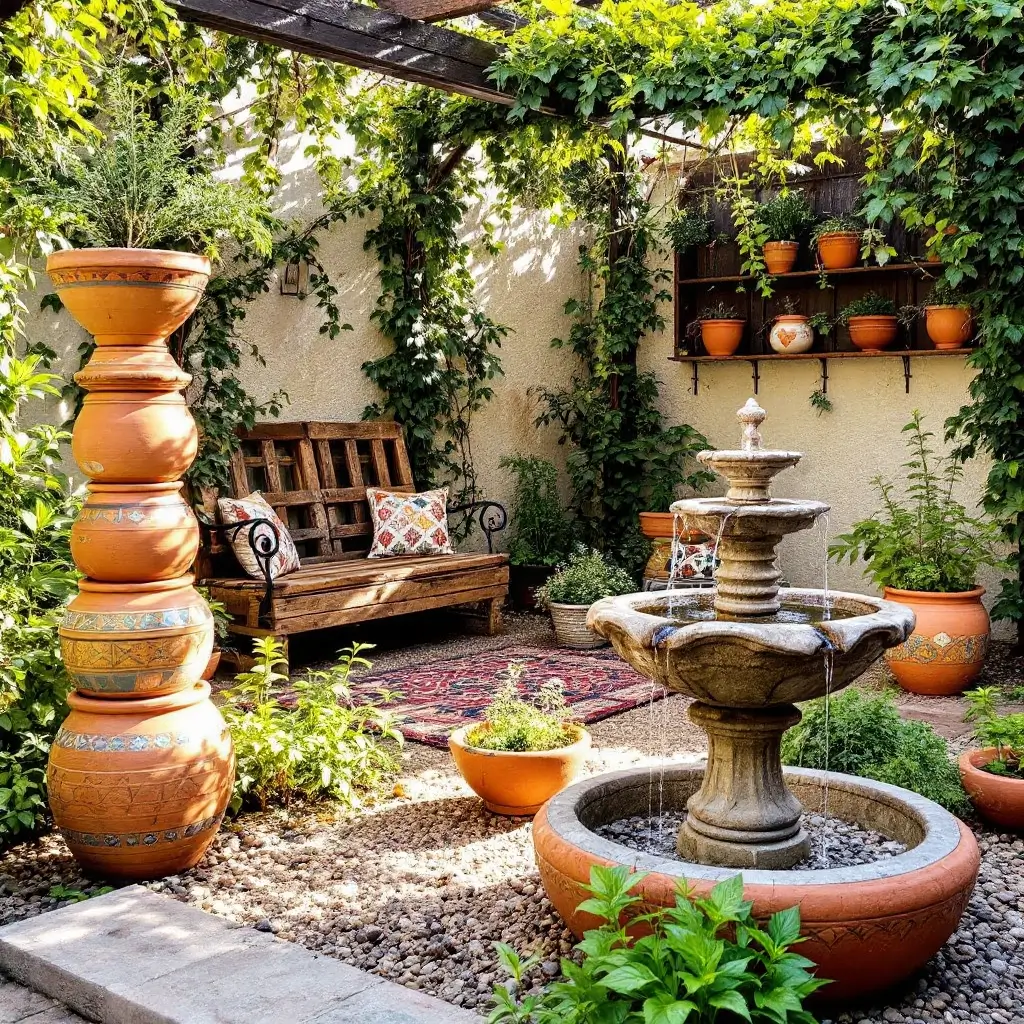
Rustic Seating Areas (Pallet Benches, Wrought Iron Accents)
Rustic seating areas are the heart of an Italian backyard garden, offering a blend of charm, comfort, and practicality. By combining pallet benches and wrought iron accents, you can create inviting nooks that evoke the timeless elegance of the Mediterranean without breaking the bank. Here’s how to craft these elements affordably and authentically:
1. Pallet Benches: Sustainable & Stylish
Why Choose Pallets?
- Affordability: Often free (check local businesses, warehouses, or online marketplaces).
- Eco-Friendly: Repurposes discarded materials.
- Customizable: Adaptable to any garden size or style.
Step-by-Step Guide:
- Source Safely:
- Use heat-treated (HT) pallets (avoid chemically treated ones marked “MB”).
- Sand thoroughly to remove splinters.
- Build Basics:
- Stack 2–3 pallets vertically for the base.
- Secure with screws and reinforce with L-brackets.
- Add a horizontal pallet as the seat back.
- Weatherproof:
- Apply outdoor wood sealant or linseed oil.
- Line with outdoor cushions in ochre, sage, or terracotta hues.
Design Upgrades:
- Add Arms: Attach salvaged wood or wrought iron rods.
- Paint: Use Mediterranean tones (sage green, ochre) for cohesion.
- Storage: Tuck woven baskets underneath for garden tools or blankets.
Cost: 0–0–30 (vs. $150+ for store-bought benches).
2. Wrought Iron Accents: Timeless & Thrifty
Why Wrought Iron?
- Durability: Withstands weather and ages beautifully.
- Authenticity: Mimics classic Italian villa aesthetics.
Budget-Friendly Sourcing:
- Thrift Stores/Flea Markets: Look for old gates, chairs, or plant stands (10–10–50).
- Salvage Yards: Find scrap iron pieces for DIY projects.
- DIY Alternatives: Use black iron pipes for modern-rustic plant stands.
Restoration Tips:
- Clean: Scrub rust with vinegar and steel wool.
- Prime & Paint: Spray with rust-resistant paint (matte black for authenticity).
- Repurpose:
- Turn iron gates into trellises for climbing roses or ivy.
- Convert bed frames into bench bases.
Styling Ideas:
- Side Tables: Pair a pallet bench with a wrought iron coffee table.
- Plant Holders: Use iron brackets to hang terracotta pots.
- Lighting: Add solar-powered string lights to iron arches.
3. Cohesive Design: Blending Pallets & Iron
Layout Inspiration:
- Under a Pergola: Place a pallet bench with iron side tables beneath a bougainvillea-covered pergola.
- Garden Corner: Create a secluded spot with a bench flanked by iron planters filled with lavender.
- Dining Area: Pair a pallet table with wrought iron chairs for alfresco meals.
Comfort Tips:
- Cushions: Use Sunbrella fabric for fade-resistant durability.
- Shade: Add a canvas umbrella or reclaimed shutters.
Plant Pairings:
- Fragrant Herbs: Rosemary, thyme, or mint in iron planters.
- Trailing Vines: Ivy or jasmine on iron trellises.
4. Cost & Time Comparison
| Element | DIY Cost | Store-Bought Cost | Time Investment |
|---|---|---|---|
| Pallet Bench | 0–0–30 | 150–150–300 | 3–4 hours |
| Wrought Iron Accents | 10–10–50 | 100–100–400 | 1–2 hours (restoration) |
5. FAQs
Q1: How do I protect a pallet bench from rain?
- A1: Apply a sealant yearly and store cushions indoors during wet seasons.
Q2: Can I use wrought iron in coastal climates?
- A2: Yes! Opt for galvanized or powder-coated iron to resist salt corrosion.
Q3: What tools do I need?
- A3: Basic toolkit (screwdriver, sander, paintbrush) + creativity!
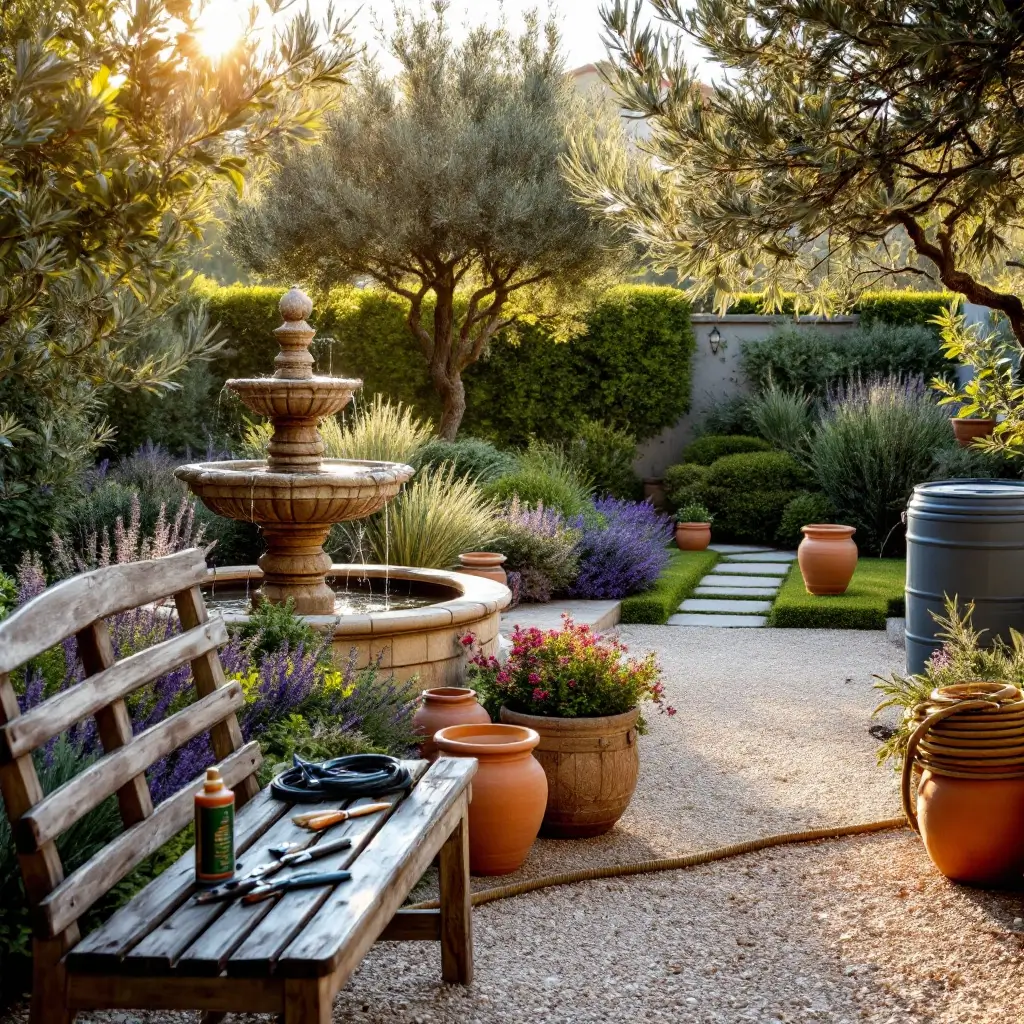
Water Features on a Budget (DIY Fountains, Birdbaths)
Water features are the soul of an Italian garden, evoking the tranquility of Mediterranean villas with their soothing sounds and reflective beauty. You don’t need a grand budget to incorporate these elements—creativity and resourcefulness can turn everyday items into stunning focal points. Here’s how to craft affordable fountains and birdbaths that embody rustic elegance.
1. DIY Fountains: Repurposed Charm
Why Add a Fountain?
- Ambiance: The gentle sound of water enhances relaxation.
- Aesthetic: Adds movement and light, reflecting Italian garden sophistication.
Budget Materials & Ideas:
- Terracotta Pot Fountain:
- Materials: Large terracotta pot, ceramic drill bit, submersible pump (15–15–25), tubing, decorative stones.
- Steps:
- Drill a hole in the pot’s base for tubing.
- Place the pump inside, thread tubing through the hole, and stack pots for a tiered effect.
- Fill with water, hide the pump with stones, and plug into a solar panel or outlet.
- Cost: 30–30–50 (vs. $150+ store-bought).
- Salvaged Urn or Bowl Fountain:
- Source: Thrift stores, flea markets, or broken planters.
- Design: Pair with a bamboo spout or copper tubing for a vintage look.
Pro Tips:
- Use a solar-powered pump to save energy and simplify installation.
- Add mosaic tiles to the fountain base for Mediterranean flair.
2. DIY Birdbaths: Upcycled Elegance
Why Birdbaths?
- Wildlife Appeal: Attracts birds while adding visual interest.
- Versatility: Doubles as a garden sculpture.
Thrifty Designs:
- Pedestal Birdbath:
- Materials: Vintage bowl (ceramic, metal) + old column, stool, or stacked stones.
- Assembly: Secure the bowl to the base with waterproof adhesive.
- Decor: Paint with weather-resistant ochre or sage; line the bowl with pebbles for grip.
- Tiered Terracotta Birdbath:
- Stack: Use three decreasing-sized pots glued around a central rod.
- Top Layer: Fill the uppermost pot with shallow water.
Safety & Maintenance:
- Stability: Anchor heavy bases with gravel to prevent tipping.
- Clean Weekly: Refresh water and scrub with vinegar to prevent algae.
3. Maintenance & Seasonal Care
- Prevent Stagnation: Add a small pump or fountain attachment to birdbaths for water movement.
- Winter Prep: Drain and cover features in freezing climates; store pumps indoors.
- Eco-Friendly Additions: Use rainwater or introduce mosquito dunks (non-toxic) to deter pests.
4. Cost Comparison Table
| Feature | DIY Cost | Store-Bought Equivalent | Savings |
|---|---|---|---|
| Terracotta Fountain | 30–30–50 | 150–150–300 | 70–80% |
| Upcycled Birdbath | 5–5–20 | 50–50–150 | 60–90% |
| Solar Pump | 20–20–40 | 50–50–100 | 50–60% |
5. Design Tips for Italian Flair
- Symmetry: Flank fountains with clipped boxwood or matching olive trees.
- Natural Materials: Use local stones, terracotta, or weathered iron for authenticity.
- Lighting: Highlight features with solar-powered LED lights for evening allure.
6. FAQs
Q1: Can I build a fountain without electricity?
- A1: Yes! Solar-powered pumps or gravity-fed designs (using elevation) work beautifully.
Q2: How to hide fountain tubing?
- A2: Camouflage with rocks, trailing plants like ivy, or mosaic patterns.
Q3: What if my birdbath freezes in winter?
- A3: Use heated birdbath mats (20–20–30) or switch to a seasonal solar fountain.
Small-Space Solutions for Italian Backyard Gardens

Vertical Gardens (Climbing Roses, Bougainvillea on Trellises)
Vertical gardens are a hallmark of Italian design, marrying form and function to transform walls, fences, and pergolas into living tapestries of color and fragrance. By training climbing roses and bougainvillea on trellises, arbors, or repurposed structures, you can evoke the romance of Tuscan villas while maximizing small spaces. Here’s how to cultivate these iconic climbers for drama, shade, and Mediterranean charm—all on a budget.
1. Climbing Roses: Timeless Elegance
Why They Shine:
- Fragrance & Blooms: Repeat-flowering varieties like Zephirine Drouhin or New Dawn perfume the air.
- Versatility: Ideal for arches, pergolas, or walls.
- Hardiness: Thrive in USDA zones 5–9 with minimal care.
Budget-Friendly Tips:
- Bare-Root Savings: Purchase dormant bare-root roses (15–15–25) instead of potted plants ($40+).
- DIY Supports: Repurpose old ladders, cattle panels, or salvaged iron gates as trellises.
- Propagate: Take hardwood cuttings in late fall for free new plants.
Planting & Care:
- Sun: 6+ hours daily.
- Soil: Well-draining, enriched with compost.
- Pruning: Remove dead wood in early spring; train canes horizontally for more blooms.
Design Ideas:
- Pergola Canopy: Train roses over a wooden arch for a shaded seating area.
- Wall Art: Espalier roses against a sunny wall for structured beauty.
- Mixed Planting: Pair with lavender or catmint at the base for contrast.
2. Bougainvillea: Mediterranean Color Explosion
Why It’s Essential:
- Vibrant Bracts: Papery blooms in magenta, coral, or white (technically leaves, not flowers).
- Drought Tolerance: Thrives in hot, dry climates (zones 9–11).
- Fast Growth: Covers unsightly walls or fences in 1–2 seasons.
Budget Strategies:
- Small Starts: Buy young plants (10–10–20) and let them climb; they grow quickly.
- Containers: Grow in pots with trellises to control size and overwinter indoors in cold climates.
- Propagation: Root semi-hardwood cuttings in summer.
Care Basics:
- Sun: Full sun (minimum 6 hours).
- Soil: Gritty, well-draining mix (avoid heavy clay).
- Water: Deeply but infrequently once established.
- Pruning: Trim after blooming to shape; wear gloves (thorns!).
Design Ideas:
- Pergola Burst: Drape bougainvillea over a rustic iron or wooden pergola.
- Wall Cover: Train on a trellis to disguise concrete walls or chain-link fences.
- Patio Accent: Use potted bougainvillea with a small obelisk trellis for balconies.
3. Trellises & Supports: DIY & Thrifty Options
Materials to Repurpose:
- Salvaged Iron Gates: Paint with rust-resistant spray and secure to walls.
- Wooden Pallets: Disassemble and reassemble into lattice panels.
- Bamboo Poles: Lash together into a teepee or grid for a tropical twist.
Budget Build: Rustic Wooden Trellis
- Materials: 4x cedar posts, screws, twine or wire.
- Steps:
- Create a rectangular frame.
- Attach horizontal and vertical slats in a grid pattern.
- Anchor to a wall or fence with brackets.
- Cost: 20–20–30 (vs. $80+ store-bought).
4. Cost & Maintenance Comparison
| Plant | Initial Cost | Annual Care Cost | Key Perks |
|---|---|---|---|
| Climbing Roses | 15–15–30 | $10 (pruners, compost) | Fragrance, repeat blooms |
| Bougainvillea | 10–10–25 | $5 (minimal water) | Drought-tolerant, fast-growing |
| DIY Trellis | 20–20–40 | $0 | Customizable, eco-friendly |
5. Styling Tips for Italian Flair
- Color Coordination: Match bougainvillea bracts to terracotta pots or ochre walls.
- Symmetry: Flank doorways or pathways with identical rose-covered trellises.
- Layered Texture: Pair thorny roses with soft herbs (lavender, thyme) below.
6. Troubleshooting Common Issues
- Pests: Spray roses with neem oil for aphids; bougainvillea is largely pest-resistant.
- Poor Blooming: Ensure full sun; avoid over-fertilizing (especially nitrogen-heavy feeds).
- Winter Care: Mulch rose roots; move potted bougainvillea indoors if temps drop below 30°F.
7. FAQs
Q1: Can climbing roses grow in containers?
- A1: Yes! Choose compact varieties like Climbing Iceberg and use a large pot with a trellis.
Q2: How to anchor trellises without damaging walls?
- A2: Use freestanding structures or wall-mounted brackets with rubber pads to protect surfaces.
Q3: Is bougainvillea invasive?
- A3: In warm climates, it can spread aggressively—regular pruning and container growth help control it.
Tiered Planters for Depth (Herbs, Succulents, Dwarf Cypress)
Tiered planters are a cornerstone of Italian garden design, offering vertical intrigue and layered beauty while maximizing small spaces. These multi-level structures allow you to cultivate a mix of aromatic herbs, sculptural succulents, and structured evergreens like dwarf cypress, evoking the charm of a sun-drenched Mediterranean hillside. Here’s how to design, build, and maintain tiered planters that blend form, function, and frugality.
1. Why Tiered Planters?
- Space Efficiency: Perfect for balconies, patios, or compact yards.
- Visual Drama: Adds height and depth, mimicking the terraced vineyards of Tuscany.
- Plant Diversity: Hosts sun-loving herbs, drought-tolerant succulents, and evergreen structure in one feature.
2. Plant Selection for Italian Flair
A. Herbs (Practical & Fragrant)
- Rosemary: Upright varieties (Tuscan Blue) for vertical accents.
- Thyme: Creeping types (Elfin) to spill over edges.
- Basil & Oregano: For culinary charm and lush greenery.
B. Succulents (Texture & Drought Resilience)
- Sedum: Angelina for golden trailing foliage.
- Echeveria: Rosette shapes in sage and plum hues.
- Aeonium: Striking architectural forms.
C. Dwarf Cypress (Mediterranean Structure)
- Cupressus sempervirens ‘Tiny Tower’: Columnar shape for vertical lines.
- Chamaecyparis obtusa ‘Nana Gracilis’: Soft, fern-like texture.
3. DIY Tiered Planter Ideas
A. Terracotta Pot Tower
- Materials: 3–5 pots (descending sizes), rebar/sturdy rod, drill.
- Steps:
- Drill drainage holes in each pot.
- Thread pots onto the rod, securing with gravel at the base.
- Plant herbs (top), succulents (middle), and dwarf cypress (base).
B. Repurposed Wooden Crate Stack
- Materials: 3 crates (small to large), outdoor paint (ochre/sage), brackets.
- Assembly:
- Stain or paint crates for weather resistance.
- Stack and secure with brackets; fill with soil.
- Plant cascading succulents in upper tiers, herbs in mid-level, and cypress at the base.
C. Vintage Ladder Planter
- Materials: Old wooden ladder, hanging pots/liners.
- Style: Suspend terracotta pots or metal tins from rungs.
4. Design Tips for Authentic Appeal
- Color Palette: Warm terracotta, sage greens, and muted ochre for pots and planters.
- Texture Contrast: Pair feathery cypress with spiky succulents and soft herbs.
- Symmetry: Flank staircases or entryways with matching tiered planters.
5. Maintenance & Care
- Watering:
- Top Tier: Light watering for succulents.
- Lower Tiers: Moderate moisture for herbs and cypress.
- Sunlight: Full sun (6+ hours daily) for Mediterranean plants.
- Pruning: Trim herbs regularly; shape cypress in spring.
6. Budget & Sustainability Tips
- Upcycle: Use broken pots, pallets, or salvaged furniture.
- Propagate: Grow herbs from cuttings or succulents from leaves.
- Cost Comparison:
- DIY Tiered Planter: 20–20–50 (vs. 100–100–300 store-bought).
7. Troubleshooting Common Issues
- Poor Drainage: Add gravel/perlite to soil; ensure planter holes.
- Overcrowding: Space plants to allow airflow and growth.
- Winter Care: Move planters indoors or wrap dwarf cypress in burlap during frost.
8. Styling Inspiration
- Al Fresco Dining Corner: Place a herb-filled tiered planter beside a wrought iron bistro set.
- Entryway Elegance: Frame a doorway with symmetrical planters featuring dwarf cypress and trailing sedum.
- Vertical Herb Garden: Stack terracotta pots near the kitchen for fresh basil and thyme.
Multi-Functional Zones (Dining Areas + Compact Herb Gardens)
Italian gardens are designed for la dolce vita—slow living that celebrates food, family, and nature. By blending dining areas with compact herb gardens, you can craft a backyard oasis where meals are seasoned with freshly picked herbs, and every gathering feels like a Mediterranean escape. Here’s how to design these zones for beauty, flavor, and function:
1. Why Combine Dining & Herb Gardens?
- Convenience: Snip herbs while cooking or dining al fresco.
- Aesthetic Harmony: Soften hardscapes with greenery and fragrance.
- Space Efficiency: Ideal for small patios, balconies, or courtyard gardens.
2. Design Ideas for Italian Flair
A. Herb-Integrated Dining Tables
Concept: Build or upcycle a table with a built-in herb planter as a centerpiece.
DIY Steps:
- Materials: Wooden table frame, galvanized trough or terracotta pots, waterproof liner.
- Assembly:
- Cut a center hole in the tabletop to fit the planter.
- Fill with herbs like basil, thyme, and oregano.
- Styling: Add mason jar candle holders and woven placemats for rustic charm.
Budget: 50–50–100 (vs. $300+ for pre-made versions).
B. Perimeter Herb Borders
Concept: Line dining areas with raised herb beds or trough planters.
Design Tips:
- Use repurposed stone or salvaged bricks for edging.
- Plant tall herbs (rosemary, sage) at the back and trailing varieties (thyme, creeping oregano) at the edges.
C. Vertical Herb Walls
Concept: Install wall-mounted planters or pallet gardens near seating areas.
Materials:
- Upcycled pallets, pocket planters, or hanging terracotta pots.
- Herbs: Compact basil, parsley, mint (in contained pots to prevent spreading).
3. Plant Selection for Dining Zones
| Herb | Culinary Use | Aesthetic Role | Growing Tips |
|---|---|---|---|
| Basil | Pesto, salads, caprese | Lush green foliage | Pinch flowers to prolong growth |
| Rosemary | Roasts, breads, oils | Vertical structure; fragrant | Drought-tolerant; full sun |
| Thyme | Soups, meats, marinades | Trailing/spilling texture | Well-draining soil |
| Oregano | Pizzas, sauces | Purple blooms attract pollinators | Prune regularly |
Bonus: Add edible flowers like nasturtiums (peppery flavor) or calendula (colorful garnish).
4. Budget-Friendly Furniture & Decor
A. Seating Solutions:
- Pallet Benches: Sand and paint with sage or ochre; add outdoor cushions.
- Thrifted Chairs: Refresh with wrought iron spray paint or woven seats.
B. Shade & Ambiance:
- DIY Pergola: Use reclaimed wood and train jasmine or grapevines overhead.
- String Lights: Solar-powered LEDs for evening enchantment.
C. Tableware:
- Terracotta Plates: Inexpensive and authentically Italian.
- Enamelware: Durable, vintage-inspired pitchers and bowls.
5. Maintenance Tips for Busy Spaces
- Pruning: Trim herbs weekly to encourage bushy growth and prevent legginess.
- Watering: Use drip irrigation or self-watering planters for low-eff care.
- Pest Control: Plant marigolds nearby to deter aphids; avoid chemicals near dining areas.
6. Cost Breakdown
| Element | Budget Approach | Cost |
|---|---|---|
| Herb-Integrated Table | Upcycled wood + trough | 50–50–80 |
| Vertical Herb Wall | Salvaged pallet + pots | 20–20–40 |
| Dining Chairs | Thrifted + spray paint | 10–10–30 each |
| String Lights | Solar-powered LED strands | 15–15–25 |
7. FAQs
Q1: How to keep herbs thriving in a shaded dining area?
- A1: Choose shade-tolerant herbs like parsley, mint, or chives.
Q2: Can I grow herbs year-round in cold climates?
- A2: Move potted herbs indoors near a sunny window or use a small greenhouse.
Q3: What herbs repel mosquitoes naturally?
- A3: Basil, rosemary, and lavender deter pests while adding fragrance.
Maintaining Your Affordable Mediterranean Escape
Seasonal Pruning Tips (Olive Trees, Lavender, Boxwood)
Pruning is essential for maintaining the health, shape, and productivity of your Italian garden’s key plants. Here’s a detailed guide to seasonal pruning for olive trees, lavender, and boxwood, tailored to enhance both aesthetics and vitality.
1. Olive Trees: Structure and Sunlight
When to Prune:
- Best Time: Late winter to early spring (after last frost, before flowering).
- Avoid: Pruning during frost or extreme heat.
How to Prune:
- Remove Dead/Diseased Branches: Use clean, sharp loppers to cut at the base.
- Thin the Canopy: Trim inward-growing branches to improve airflow and sunlight penetration.
- Shape for Open Center: Create a vase-like structure to mimic traditional Italian styles.
- Suckers: Remove shoots growing from the base to direct energy to the main tree.
Tools Needed:
- Bypass loppers, pruning saw, disinfectant (for tool cleaning).
Common Mistakes:
- Over-pruning (remove no more than 20% of the canopy annually).
- Pruning during fruiting season (reduces olive yield).
2. Lavender: Prevent Woodiness, Promote Blooms
When to Prune:
- Primary Prune: Late summer, after flowering (trim spent blooms).
- Light Prune: Early spring (remove winter damage before new growth).
How to Prune:
- Trim Flower Stalks: Cut back 1/3 of the plant, just above green growth.
- Shape Gently: Avoid cutting into old, woody stems (they may not regrow).
- Maintain Mound Form: Follow natural curves for a tidy, Mediterranean look.
Tools Needed:
- Sharp hand shears, gloves.
Common Mistakes:
- Pruning too late in fall (exposes new growth to frost).
- Shearing into bare wood (causes dieback).
3. Boxwood: Shape and Density
When to Prune:
- Best Time: Late spring/early summer (after new growth hardens).
- Light Touch-Ups: Mid-summer for formal shapes.
- Avoid: Late fall (prevents frost damage to tender cuts).
How to Prune:
- Thin for Airflow: Remove crowded branches to reduce disease risk.
- Shape Gradually: Use hand shears for precision; step back frequently to assess symmetry.
- Rejuvenate Overgrown Plants: Cut back 1/3 of old growth over 3 years.
Tools Needed:
- Hand shears (for detail work), electric trimmers (for large hedges).
Common Mistakes:
- “Boxing” (shearing only the outer layer, leading to dense outer shell and dead interior).
- Using dull blades (causes ragged edges and brown tips).
Seasonal Pruning Calendar
| Plant | Late Winter | Spring | Summer | Fall |
|---|---|---|---|---|
| Olive | ✔️ Major prune | ✖️ | ✖️ | ✖️ |
| Lavender | ✖️ | ✔️ Light trim | ✔️ Post-bloom | ✖️ |
| Boxwood | ✖️ | ✔️ Shape/maintain | ✔️ Touch-ups | ✖️ |
Pro Tips for Italian Garden Aesthetics
- Olive Trees: Train for an open, sculptural form reminiscent of Tuscan groves.
- Lavender: Plant in rows or clusters for a Provençal vibe; pair with gravel paths.
- Boxwood: Craft geometric hedges or topiaries to mirror formal Renaissance gardens.
Water-Saving Irrigation (Drip Systems, Rainwater Harvesting)
Italian gardens thrive on sustainability and elegance, and water conservation is key to maintaining their beauty in harmony with the Mediterranean climate. By integrating drip irrigation and rainwater harvesting, you can reduce water waste, lower utility bills, and ensure your plants flourish. Here’s how to implement these systems effectively:
1. Drip Irrigation: Precision Watering for Mediterranean Plants
Why It Works
- Efficiency: Delivers water directly to plant roots, reducing evaporation and runoff by up to 60%.
- Healthier Plants: Prevents fungal diseases by keeping foliage dry.
- Customizable: Ideal for olive trees, lavender, herbs, and tiered planters.
Step-by-Step Setup
- Plan Your Layout:
- Map your garden, noting plant groupings (e.g., drought-tolerant succulents vs. thirstier lemon trees).
- Use a zoning system to separate plants with similar water needs.
- Gather Supplies:
- Drip tubing: Flexible tubing with emitters (0.10–0.10–0.50/foot).
- Pressure regulator: Ensures consistent flow (10–10–20).
- Emitters: Adjustable drippers (1–4 gallons/hour) or soaker hoses.
- Assemble the System:
- Connect tubing to a water source (outdoor faucet or rainwater tank).
- Lay tubing along plant rows, securing with landscape stakes.
- Install emitters at the base of plants.
- Automate:
- Add a timer (20–20–50) to schedule watering during cooler hours (early morning or dusk).
Cost Comparison
| Method | Initial Cost | Annual Water Savings |
|---|---|---|
| Drip System | 50–50–150 | 30–50% |
| Traditional Sprinkler | 100–100–300 | Baseline |
Maintenance Tips
- Flush tubing monthly to prevent clogs.
- Check emitters in spring and mid-summer.
- Winterize by draining the system before frost.
2. Rainwater Harvesting: Capture the Mediterranean Skies
Why It’s Essential
- Sustainability: Reduces reliance on municipal water.
- Cost Savings: Free water for irrigation.
- Soil Health: Rainwater is pH-neutral and chemical-free.
Methods for Italian Gardens
A. Rain Barrels
- Setup: Install under downspouts; use a diverter kit (30–30–50).
- Capacity: 50–100 gallons (enough for small herb gardens or potted plants).
- Aesthetic Tip: Paint barrels in terracotta or sage to blend with garden decor.
B. Underground Cisterns
- Ideal For: Larger gardens with olive trees or extensive landscaping.
- Capacity: 500–5,000 gallons (store seasonal rainfall).
- Cost: 1,000–1,000–3,000 (long-term investment with ROI in 5–7 years).
C. DIY Rain Chain + Basin
- Materials: Repurposed copper chains or decorative links (20–20–100) + gravel basin.
- Function: Directs water from gutters into a planted basin with water-loving herbs (mint, parsley).
Seasonal Use
- Spring/Summer: Irrigate herbs and citrus trees.
- Fall/Winter: Store water for dormant-season needs.
3. Synergy: Combine Drip + Rainwater
- Connect Systems: Link rainwater tanks to drip irrigation via a pump or gravity feed.
- Filter Water: Use a mesh screen to prevent debris from entering tubing.
- Prioritize Plants: Allocate rainwater to thirsty plants (lemon trees, basil) and use drip for drought-tolerant species (lavender, rosemary).
4. Plant-Specific Tips
| Plant | Drip Irrigation | Rainwater Use |
|---|---|---|
| Olive Trees | 2–4 hours weekly | Supplement during droughts |
| Lavender | 1 hour weekly | Minimal; thrives on neglect |
| Herb Gardens | 30 mins daily (potted) | Primary water source |
5. Budget-Friendly Hacks
- Repurpose Materials: Use old garden hoses for DIY soaker lines.
- Community Resources: Check municipal rebates for rain barrel discounts (e.g., 50% off in drought-prone areas).
- Group Plants by Water Needs: Cluster herbs and succulents separately to optimize zones.
6. Troubleshooting FAQs
Q1: How to prevent algae in rain barrels?
- A1: Use opaque containers, add a drop of vegetable oil, or install a mosquito dunk (non-toxic).
Q2: Can drip systems work with low water pressure?
- A2: Yes! Use a pressure regulator and low-flow emitters (0.5–1 GPH).
Q3: How much rainwater can I collect?
- A3: 1 inch of rain on a 1,000 sq. ft. roof ≈ 600 gallons.
Preserving Materials (Terracotta Sealing, Gravel Refresh)
Preserving the rustic charm of terracotta and the crisp elegance of gravel is essential for maintaining the authenticity and longevity of your Italian garden. These materials, while durable, require periodic care to withstand weathering, UV exposure, and wear. Below, we dive into practical, budget-friendly methods to protect terracotta and refresh gravel, ensuring your garden remains a Mediterranean masterpiece for years to come.
1. Terracotta Sealing: Protecting Porosity & Color
Why Seal Terracotta?
- Prevents Cracking: Reduces water absorption, minimizing freeze-thaw damage in colder climates.
- Retains Vibrancy: Shields against UV fading and mineral deposits (efflorescence).
- Discourages Mold: Creates a barrier against algae and moss growth.
Step-by-Step Sealing Guide
1. Clean Thoroughly:
- Scrub pots with a mix of 1:1 water and white vinegar to remove dirt, salt deposits, or mildew.
- For stubborn stains, use a soft brush and mild dish soap. Rinse and let dry completely (24–48 hours).
2. Choose the Right Sealant:
- Penetrating Sealers (e.g., Thompson’s WaterSeal): Soak into pores without altering texture. Ideal for outdoor use.
- Topical Sealers (e.g., TerraShield): Form a glossy protective layer; best for decorative pieces sheltered from rain.
3. Apply the Sealant:
- Use a foam brush or sprayer to coat the entire surface, including the interior for potted plants.
- Let the first coat dry (per product instructions), then apply a second coat for added protection.
4. Maintenance Tips:
- Reapply sealant every 1–2 years.
- Store pots indoors during harsh winters if unsealed.
Budget Hack: Use boiled linseed oil (10–10–15 per quart) for a natural, matte finish.
2. Gravel Refresh: Revitalizing Paths & Landscapes
Why Refresh Gravel?
- Restores Clean Lines: Replenishes displaced stones and eliminates uneven patches.
- Enhances Drainage: Removes compacted dirt that traps water.
- Boosts Aesthetics: Washes away debris to revive color and texture.
Step-by-Step Gravel Revival
1. Rake & Level:
- Use a bow rake to redistribute gravel evenly, filling holes and smoothing ruts.
2. Deep Clean:
- Pressure Wash: Blast away dirt and algae (use low pressure to avoid displacing stones).
- Vinegar Solution: For eco-friendly cleaning, spray 1:1 vinegar/water mix, scrub, and rinse.
3. Top Up with Fresh Gravel:
- Add 1–2 inches of new gravel (match existing type/color).
- Budget-Friendly Options: Crushed limestone (40–40–60 per ton) or pea gravel (30–30–50 per ton).
4. Install Edging:
- Use recycled bricks, steel strips, or buried timber to keep gravel contained.
Pro Tip: Lay landscape fabric beneath gravel to suppress weeds and reduce future maintenance.
3. Cost & Time Comparison
| Task | DIY Cost | Professional Cost | Time Required |
|---|---|---|---|
| Seal 10 Terracotta Pots | 20–20–40 (sealant) | 100–100–200 | 3–4 hours |
| Refresh 100 sq. ft. Gravel | 30–30–60 (new gravel) | 150–150–300 | 2–3 hours |
4. Troubleshooting Common Issues
Terracotta:
- Efflorescence (White Residue): Scrub with vinegar; reseal with a breathable sealer.
- Cracks: Repair with waterproof epoxy (10–10–15) and reseal.
Gravel:
- Weeds: Spot-treat with vinegar or pour boiling water.
- Muddy Patches: Improve drainage with a gravel base layer or French drain.
5. Eco-Friendly & Aesthetic Tips
- Terracotta: Use plant-based sealants (e.g., AFM Safecoat) for non-toxic protection.
- Gravel: Opt for locally sourced stone to reduce environmental impact.
- Design Flair: Mix white marble chips with golden gravel for a Tuscan courtyard vibe.
6. Seasonal Maintenance Schedule
| Season | Terracotta Care | Gravel Care |
|---|---|---|
| Spring | Inspect for cracks; reseal. | Rake, clean, and top up. |
| Fall | Move fragile pots indoors. | Edge paths to contain gravel. |
| Winter | Avoid watering sealed pots. | Clear snow to prevent ice buildup. |
Embrace La Dolce Vita with Your Italian Backyard Garden
Italian backyard gardens are more than a design trend—they’re a celebration of timeless elegance, sustainability, and the art of slow living. By blending symmetry, rustic materials, and drought-tolerant plants like lavender, olive trees, and boxwood, these spaces transform even the smallest yards into Mediterranean retreats.
From DIY terracotta pots and gravel pathways to water-saving irrigation and seasonal pruning, every element serves a purpose: to create harmony between nature and human craftsmanship. Whether you’re crafting a vertical garden of climbing roses or a multi-functional dining area with fresh herbs, the key lies in balancing authenticity with affordability.
Remember, an Italian garden isn’t about perfection; it’s about savoring the journey. Let weathered textures, sun-warmed hues, and the whisper of a fountain remind you that beauty thrives in simplicity. So, grab your pruners, embrace the Mediterranean palette, and turn your backyard into a sanctuary where every moment feels like a stroll through Tuscany.
Your Italian oasis awaits—buon giardinaggio! 🌿🇮🇹
3 thoughts on “Italian Backyard Gardens: 10 Affordable Mediterranean Escapes”