
There’s something magical about stepping into a beautifully decorated garden. Whether it’s a cozy backyard retreat, a vibrant flower bed, or an elegant patio adorned with twinkling lights, garden décor has the power to transform any outdoor space into a personal oasis. Beyond just functionality, garden décor allows you to express your personality, create inviting atmospheres, and enhance the natural beauty of your surroundings.
From charming garden statues and soothing water features to practical furniture and eco-friendly lighting solutions, the possibilities are endless. The right décor can turn even the smallest yard into a serene escape or make a sprawling landscape feel warm and welcoming. And the best part? You don’t need to be a professional designer to achieve stunning results—simple touches like DIY projects, seasonal arrangements, or cleverly placed ornaments can make all the difference.
In this post, we’ll explore 10 creative garden décor ideas that will inspire you to take your outdoor space to the next level. Whether you’re looking to boost curb appeal, create a relaxing haven, or simply add a touch of personality, these tips and trends will help you design a backyard oasis you’ll love spending time in. Let’s dive in and discover how to make your garden truly shine!
Functional Garden Décor for Everyday Use
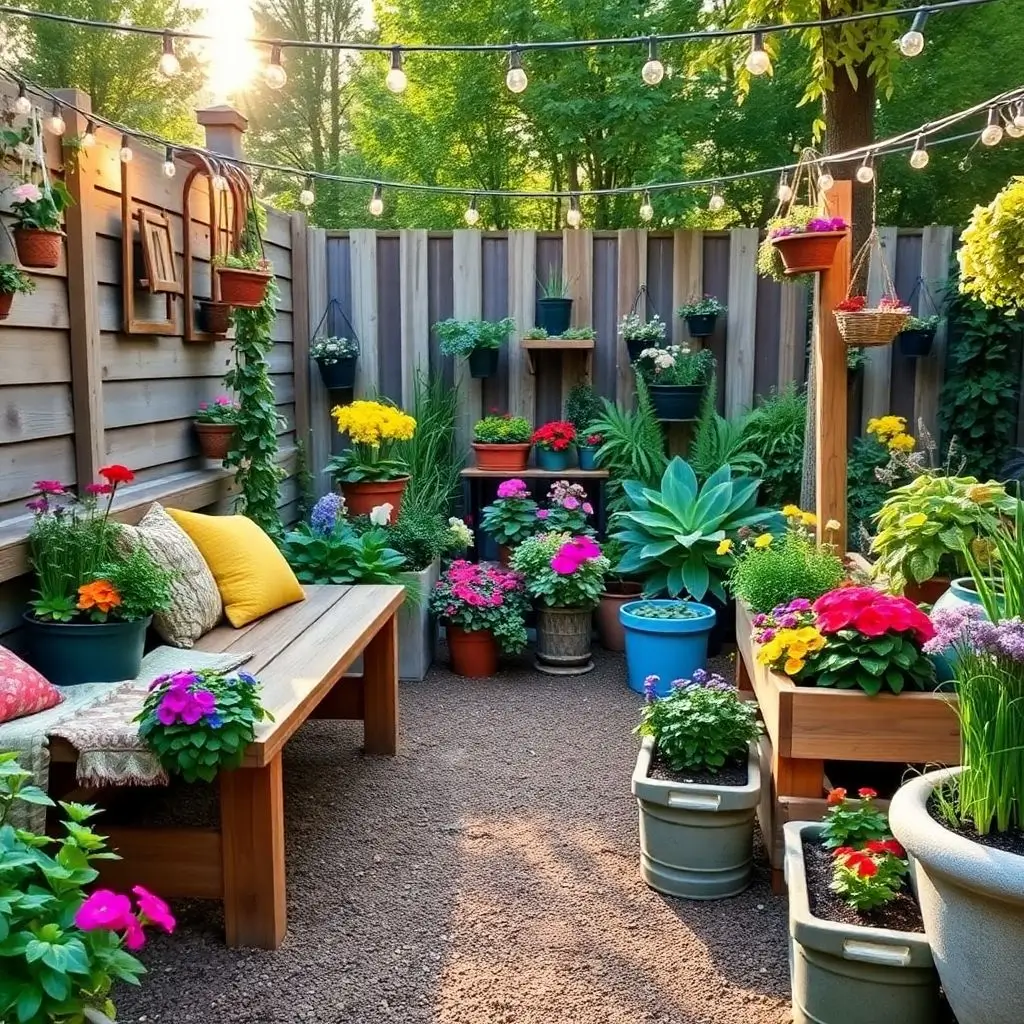
Add Comfort with Stylish Garden Benches
Garden benches are more than just functional pieces of furniture—they’re an essential element of garden décor that combines comfort, style, and practicality. Whether you’re looking to create a cozy reading nook, a spot for quiet reflection, or a welcoming area for entertaining guests, a well-placed garden bench can instantly elevate the ambiance of your outdoor space.
Why Garden Benches Are a Must-Have
A garden bench serves as both a decorative focal point and a functional seating option. It invites people to pause, relax, and take in the beauty of their surroundings. For smaller gardens, a bench can help maximize space by providing seating without overwhelming the area. In larger landscapes, it can define specific zones, such as a meditation corner or a dining area near your patio.
When choosing a garden bench, consider how it complements the overall theme of your outdoor space. For instance:
- A rustic wooden bench pairs beautifully with natural stone pathways and wildflower gardens.
- A metal bench with intricate designs adds elegance to formal gardens or modern landscapes.
- A wicker or rattan bench brings a touch of warmth and texture, perfect for bohemian or tropical-themed spaces.
Placement Tips for Maximum Impact
The placement of your garden bench is just as important as its design. Here are some ideas to make the most of this versatile piece:
- Under a Tree or Shade Structure : Position your bench under a shady tree or beneath a pergola to create a cool, inviting retreat during hot summer days.
- Near a Water Feature : Place the bench close to a fountain, pond, or small waterfall to enjoy the soothing sounds of flowing water while you relax.
- At the End of a Pathway : Use your bench as a destination point at the end of a winding garden path, encouraging exploration and discovery.
- Facing a Flower Bed or View : Orient the bench toward your favorite flower bed, scenic vista, or sunset view to enhance the experience of sitting outdoors.
Styling Your Garden Bench
To make your garden bench stand out as a décor piece, accessorize it thoughtfully:
- Add Cushions and Throws : Soften the look of wooden or metal benches with weather-resistant cushions in vibrant colors or neutral tones, depending on your garden’s palette.
- Incorporate Potted Plants : Place potted plants or flowers on either side of the bench to frame it and add life to the area.
- Include Side Tables or Plant Stands : Add a small side table or plant stand next to the bench for convenience, whether it’s for holding a cup of tea or displaying decorative items like lanterns or books.
DIY Option: Build Your Own Garden Bench
If you’re feeling crafty, why not try building your own garden bench? DIY projects allow you to customize the size, material, and design to perfectly suit your space. For example:
- Use reclaimed wood for a rustic, eco-friendly bench.
- Paint or stencil patterns onto a plain bench to match your garden’s color scheme.
- Add unique touches like built-in storage compartments or curved backs for extra flair.
No matter which style or placement you choose, a garden bench is sure to become one of the most cherished features of your outdoor space. Not only does it provide a place to sit and unwind, but it also enhances the visual appeal of your garden, making it feel more inviting and complete.
Create Shade with Pergolas or Gazebos
When it comes to transforming your backyard into a functional and stylish oasis, adding shade structures like pergolas or gazebos is one of the most impactful choices you can make. These architectural elements not only provide relief from the sun but also serve as stunning focal points that enhance the overall aesthetic of your outdoor space. Whether you’re looking to create a cozy retreat for relaxation or an elegant setting for entertaining, pergolas and gazebos are versatile additions that blend beauty and practicality.
Why Choose Pergolas or Gazebos?
Pergolas and gazebos are more than just shade providers—they’re statement pieces that define the character of your garden. Here’s why they’re worth considering:
- Shade Without Sacrificing Style : Unlike solid roofs, pergolas and gazebos offer partial shade while still allowing sunlight to filter through, creating a soft, dappled effect that enhances the natural ambiance of your garden.
- Versatility in Design : From rustic wooden pergolas to sleek, modern gazebos, these structures come in a variety of styles to match any garden theme.
- Multi-Functional Spaces : They can be used as dining areas, lounging spots, or even intimate venues for gatherings, making them highly adaptable to your needs.
Pergolas: The Perfect Blend of Openness and Structure
A pergola is a freestanding or attached structure featuring vertical posts and horizontal beams, often left open on the sides. Its open design makes it ideal for creating semi-shaded areas without feeling enclosed. Here’s how you can incorporate a pergola into your garden:
- Attach It to Your Home : A pergola connected to your house can extend your living space outdoors, seamlessly blending indoor and outdoor areas. Use it to cover a patio or deck, creating a shaded spot for morning coffee or evening cocktails.
- Define a Garden Pathway : Install a pergola over a garden walkway to guide visitors through your landscape while offering a shaded stroll. Enhance it further by training climbing plants like ivy, wisteria, or jasmine to grow along the beams for a lush, green canopy.
- Add Outdoor Curtains or Canopies : For extra shade or privacy, hang weather-resistant curtains or install a retractable canopy. This allows you to adjust the level of shade depending on the time of day or season.
Gazebos: Enclosed Elegance for All Seasons
Unlike pergolas, gazebos are typically fully enclosed structures with a solid roof and sometimes even screens or windows. Their enclosed design makes them perfect for year-round use, offering protection from both sun and rain. Here’s how to make the most of a gazebo:
- Create a Cozy Lounge Area : Furnish your gazebo with comfortable seating, such as a sectional sofa, armchairs, or floor cushions. Add side tables, rugs, and lanterns to complete the look and turn it into a relaxing hideaway.
- Use It as an Outdoor Dining Room : Equip your gazebo with a dining table and chairs to host al fresco meals or afternoon tea parties. The sheltered environment ensures you can enjoy meals outdoors regardless of the weather.
- Incorporate Lighting and Decor : String lights, chandeliers, or solar-powered lamps can transform your gazebo into a magical evening retreat. Add potted plants, wind chimes, or decorative sculptures to personalize the space.
DIY Option: Build Your Own Pergola or Gazebo
If you’re handy with tools, building your own pergola or gazebo can be a rewarding project that adds a personal touch to your garden. Here are some ideas to get started:
- For a Pergola : Use pressure-treated wood or cedar for durability. Keep the design simple with four posts and crossbeams, or go elaborate by adding lattice panels for climbing plants.
- For a Gazebo : Opt for pre-fabricated kits if you’re short on time, or construct a custom gazebo using materials like vinyl, metal, or wood. Consider adding removable screens for versatility.
- Eco-Friendly Touches : Incorporate sustainable materials like bamboo or recycled plastic lumber to reduce your environmental footprint.
Styling Tips for Pergolas and Gazebos
Once your pergola or gazebo is in place, style it to reflect your personality and complement your garden décor:
- Climbing Plants : Train vines like clematis, honeysuckle, or bougainvillea to grow on your pergola for a natural, living roof.
- Furniture Arrangement : Arrange furniture in a way that maximizes comfort and flow. For example, position seating to face a scenic view or a water feature.
- Accessories : Add finishing touches like throw pillows, outdoor rugs, and decorative lanterns to make the space feel inviting and cohesive.
The Benefits of Adding Shade Structures
Beyond their visual appeal, pergolas and gazebos offer several practical benefits:
- Temperature Control : They help regulate the temperature in your outdoor space, making it more comfortable during hot summer days.
- Increased Property Value : Well-designed shade structures can significantly boost your home’s curb appeal and market value.
- Year-Round Enjoyment : With proper styling and accessories, these structures can be enjoyed throughout the seasons, extending the usability of your outdoor area.
By incorporating a pergola or gazebo into your garden, you’re not just adding shade—you’re creating a versatile, stylish space that invites you to linger and enjoy the beauty of the outdoors. Whether you choose a minimalist pergola or a fully enclosed gazebo, these structures are sure to become the heart of your backyard oasis.
Incorporate Practical Storage Solutions
When designing a beautiful and functional garden, it’s easy to focus on the decorative elements like statues, lights, and plants. However, one often overlooked yet essential aspect of garden décor is storage . Practical storage solutions not only help keep your outdoor space organized but can also double as stylish décor pieces that enhance the overall aesthetic of your backyard oasis. From hiding gardening tools to stashing cushions and outdoor accessories, incorporating clever storage ideas ensures your garden remains both tidy and inviting.
Why Storage Matters in Garden Design
A clutter-free garden feels more spacious, serene, and enjoyable. Without proper storage, items like hoses, pots, planters, and outdoor furniture cushions can quickly pile up, creating visual chaos. By integrating practical storage solutions into your garden design, you can:
- Maximize Space : Keep pathways clear and make small gardens feel larger.
- Protect Your Belongings : Safeguard items like cushions, tools, and seasonal decorations from weather damage.
- Enhance Aesthetics : Use stylish storage options that blend seamlessly with your garden décor, turning functionality into beauty.
Types of Garden Storage Solutions
Here are some creative and practical ways to incorporate storage into your outdoor space:
- Wicker or Rattan Storage Bins
- Why It Works : Wicker or rattan bins add a touch of warmth and texture while providing discreet storage for smaller items like gardening gloves, hand tools, or seed packets.
- Styling Tip : Place these bins near seating areas or under tables to keep essentials within reach without detracting from the décor.
- Weatherproof Outdoor Cabinets
- Why It Works : These sturdy cabinets are perfect for storing larger items like watering cans, fertilizers, or even outdoor games. Many models come with lockable doors to keep contents secure.
- Placement Ideas : Position the cabinet against a wall or fence, or integrate it into a corner of your patio where it won’t obstruct foot traffic.
- Decorative Trunks or Chests
- Why It Works : Vintage-inspired trunks or wooden chests serve dual purposes—they store items like cushions, blankets, or seasonal decorations while acting as eye-catching décor pieces.
- Styling Tip : Use a trunk as a coffee table centerpiece on your patio, adding a tray on top for drinks or books. Choose designs with intricate carvings or distressed finishes for added charm.
- Vertical Shelving Units
- Why It Works : Vertical shelving is ideal for small spaces, allowing you to store and display potted plants, tools, or decorative items without taking up valuable floor space.
- DIY Option : Build your own shelving unit using reclaimed wood or metal pipes for an eco-friendly and customizable solution.
- Hidden Benches with Built-In Storage
- Why It Works : Benches with hidden compartments are perfect for storing items like seat cushions, pool toys, or picnic supplies. They’re especially useful in compact gardens where every piece of furniture needs to multitask.
- Placement Ideas : Place these benches near dining areas or along pathways for easy access.
Creative Ways to Style Your Storage Solutions
Storage doesn’t have to be purely utilitarian—it can also contribute to the overall look and feel of your garden. Here are some styling tips:
- Match Materials to Your Theme : If your garden has a rustic vibe, opt for wooden crates or barrels. For modern gardens, sleek metal or minimalist plastic containers work well.
- Add Greenery : Incorporate potted plants or trailing vines around your storage pieces to soften their appearance and blend them into the landscape.
- Use Color Strategically : Paint storage bins or chests in colors that complement your garden palette, such as soft pastels for a cottage-style garden or bold hues for a tropical theme.
DIY Option: Upcycle Old Furniture into Storage
If you’re looking for a budget-friendly and eco-conscious option, consider upcycling old furniture into unique storage solutions:
- Turn an old dresser into a vertical planter and storage unit by removing some drawers and painting it in vibrant colors.
- Repurpose wine crates or wooden pallets into stackable shelves for holding pots, tools, or decorative items.
- Transform a vintage suitcase into a quirky side table with hidden storage inside.
The Benefits of Thoughtful Garden Storage
Incorporating practical storage solutions into your garden design offers numerous advantages:
- Improved Organization : Everything has its place, making it easier to find what you need when you need it.
- Enhanced Curb Appeal : Stylish storage pieces elevate the visual appeal of your garden, turning utility into art.
- Increased Usability : A tidy garden is more enjoyable to spend time in, whether you’re relaxing solo or hosting guests.
By thoughtfully integrating storage solutions into your garden, you can create a space that’s not only beautiful but also highly functional. Whether you choose ready-made options or get creative with DIY projects, these additions will ensure your backyard oasis remains a haven of order and charm.
Aesthetic Enhancements to Elevate Your Space
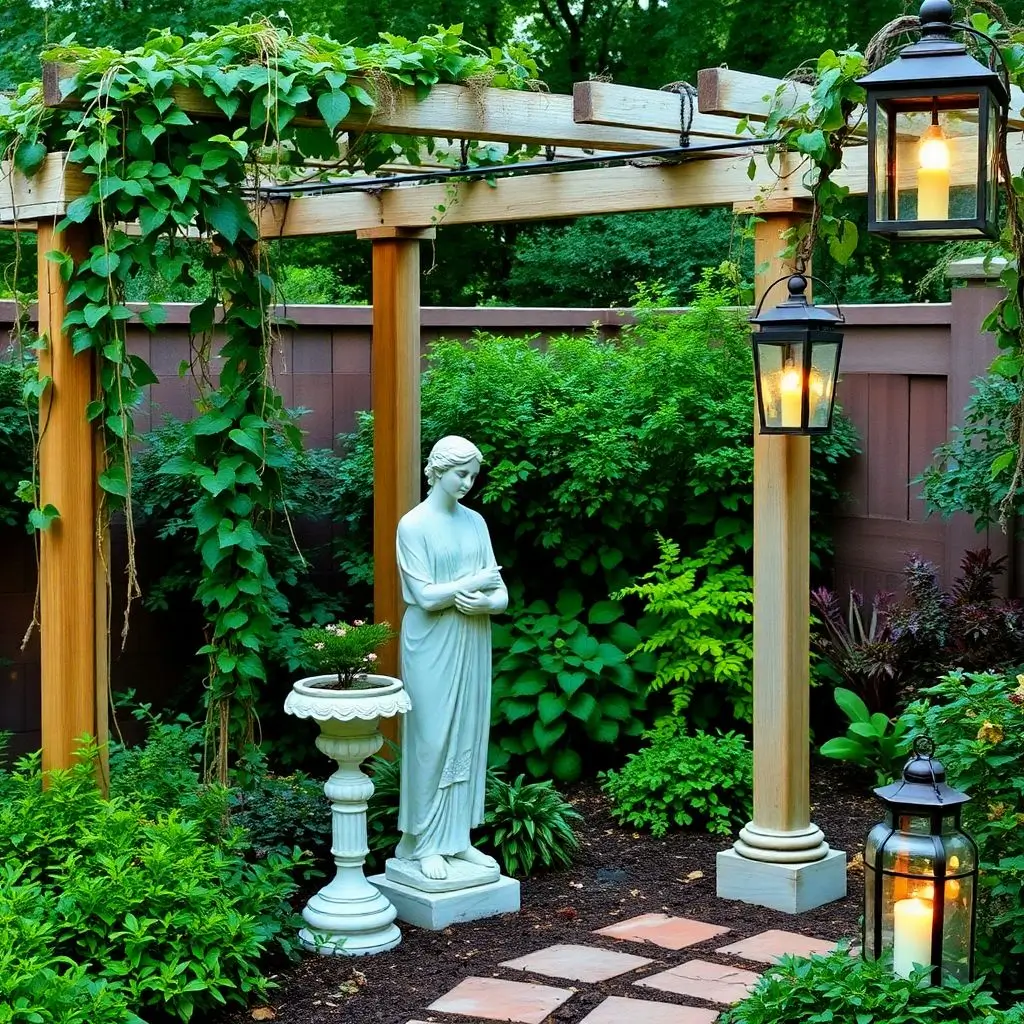
Decorate with Eye-Catching Garden Statues
Garden statues are timeless pieces of décor that can instantly elevate the charm and personality of your outdoor space. Whether you’re aiming for a whimsical, classical, or modern aesthetic, these artistic accents serve as focal points that draw the eye and spark conversation. From elegant angels to playful animal figurines, garden statues are versatile enough to complement any theme while adding a touch of sophistication or whimsy to your backyard oasis.
Why Garden Statues Are a Must-Have
Garden statues aren’t just decorative—they’re storytelling elements that reflect your personal style and enhance the narrative of your outdoor space. Here’s why they’re worth considering:
- Create Visual Interest : Statues act as eye-catching centerpieces, breaking up monotonous greenery and adding depth to your landscape design.
- Express Personality : Whether you prefer serene Buddha figures, rustic farm animals, or abstract sculptures, statues allow you to infuse your garden with character and meaning.
- Add Timeless Appeal : Unlike trendy décor items, high-quality garden statues often stand the test of time, becoming cherished features of your garden for years to come.
Types of Garden Statues to Consider
The variety of garden statues available means there’s something for every taste and garden style. Here are some popular options to inspire you:
- Classical Figures
- Examples : Greek or Roman-inspired statues like urns, cherubs, or goddesses.
- Best For : Formal gardens or spaces with a traditional, elegant vibe.
- Placement Tip : Position these statues near entryways, fountains, or at the end of a grand pathway to create a sense of arrival.
- Keyword Integration : “garden ornaments,” “classic garden décor.”
- Whimsical Animal Statues
- Examples : Frogs, rabbits, deer, or birds in playful poses.
- Best For : Cottage-style gardens or family-friendly spaces where fun and lightheartedness are key.
- Placement Tip : Tuck these statues among flower beds, under trees, or along pathways to surprise and delight visitors as they explore your garden.
- Keyword Integration : “yard art,” “creative garden décor ideas.”
- Religious or Spiritual Statues
- Examples : Buddha, Virgin Mary, or angelic figures.
- Best For : Meditation corners, Zen gardens, or spaces meant for reflection and tranquility.
- Placement Tip : Place these statues in quiet, secluded areas surrounded by lush greenery or water features to enhance their calming presence.
- Keyword Integration : “serene garden décor,” “spiritual garden accessories.”
- Abstract or Modern Sculptures
- Examples : Geometric shapes, minimalist designs, or bold metallic pieces.
- Best For : Contemporary gardens or urban patios with clean lines and neutral color palettes.
- Placement Tip : Use these statues as standalone features on lawns, decks, or terraces where they can shine without competing with other elements.
- Keyword Integration : “modern garden décor trends,” “unique outdoor decor.”
- Humorous or Quirky Statues
- Examples : Gnomes, oversized mushrooms, or cartoonish characters.
- Best For : Adding a playful touch to casual or themed gardens.
- Placement Tip : Scatter these statues throughout your garden to create moments of discovery and joy, especially in children’s play areas or whimsical-themed spaces.
- Keyword Integration : “fun garden décor,” “quirky yard art.”
Tips for Choosing the Right Statue
Selecting the perfect garden statue involves more than just picking something you like—it’s about ensuring it complements your space and enhances its overall design. Here are some tips:
- Match the Scale : Choose a statue size that fits your garden’s proportions. A large statue can overwhelm a small space, while a tiny piece might get lost in a sprawling landscape.
- Consider Material Durability : Opt for weather-resistant materials like stone, concrete, resin, or metal to ensure your statue withstands the elements.
- Think About Placement : The location of your statue matters. Place it where it can be admired from multiple angles, such as near seating areas, along pathways, or in open lawn spaces.
Styling Ideas for Garden Statues
To make your garden statues truly stand out, consider these styling techniques:
- Surround with Greenery : Frame your statue with shrubs, flowers, or climbing plants to create a natural vignette. For example, place a stone angel statue amidst lavender bushes for a fragrant and picturesque display.
- Incorporate Lighting : Highlight your statues with solar-powered spotlights or string lights to create dramatic effects, especially during evening hours.
- Group Them Creatively : Instead of using a single statue, cluster smaller ones together to form a themed collection, such as woodland creatures or mythical beings.
- Add Water Features : Pair statues with fountains, ponds, or birdbaths to enhance their visual impact and create a soothing ambiance.
DIY Option: Personalize Your Own Garden Statue
If you’re feeling crafty, why not create your own custom garden statue? DIY projects allow you to tailor the design to your exact preferences and budget. Here are some ideas:
- Painted Concrete Statues : Purchase plain concrete statues and paint them in vibrant colors or intricate patterns to match your garden’s theme.
- Upcycled Materials : Transform old tires, bottles, or scrap metal into quirky sculptures that double as eco-friendly décor.
- Handmade Clay Figures : If you enjoy pottery, sculpt your own small statues and glaze them for a personalized touch.
The Benefits of Adding Garden Statues
Incorporating garden statues into your outdoor space offers both aesthetic and emotional benefits:
- Enhanced Curb Appeal : Statues add a layer of sophistication and intrigue, making your garden more visually appealing.
- Personal Expression : They allow you to showcase your unique tastes and interests, turning your garden into a true reflection of who you are.
- Year-Round Beauty : Unlike seasonal flowers, statues remain constant throughout the year, providing consistent charm regardless of the weather.
By thoughtfully selecting and placing garden statues, you can transform your outdoor space into a captivating retreat that tells a story and invites exploration. Whether you choose classic elegance, playful whimsy, or modern minimalism, these timeless pieces will undoubtedly become cherished highlights of your backyard oasis.
Add Charm with Wind Chimes and Hanging Planters
When it comes to enhancing the ambiance of your garden, few elements are as enchanting as wind chimes and hanging planters . These versatile décor pieces not only add visual appeal but also engage multiple senses—wind chimes create soothing melodies that dance through the air, while hanging planters bring lush greenery and vibrant blooms to eye level. Together, they transform your outdoor space into a serene and inviting retreat, blending beauty, sound, and life.
Why Wind Chimes and Hanging Planters Are Essential
Both wind chimes and hanging planters serve unique yet complementary roles in garden design:
- Wind Chimes : These delicate instruments introduce an auditory element to your garden, turning gentle breezes into calming music. They’re perfect for creating a peaceful atmosphere or masking unwanted noise from nearby streets.
- Hanging Planters : By elevating plants off the ground, hanging planters maximize vertical space, making them ideal for small gardens or patios. They also draw attention upward, adding layers and dimension to your landscape.
Whether used individually or together, these elements can elevate your garden’s charm and functionality.
The Magic of Wind Chimes
Wind chimes come in a variety of materials, designs, and sounds, allowing you to choose one that matches your garden’s personality and purpose.
Types of Wind Chimes
- Metal Wind Chimes
- Sound Profile : Bright, resonant tones that carry far.
- Best For : Modern or minimalist gardens where sleek lines and metallic finishes shine.
- Placement Tip : Hang metal chimes near seating areas or entryways to greet visitors with their crisp notes.
- Wooden or Bamboo Wind Chimes
- Sound Profile : Soft, earthy clinks that blend seamlessly with nature.
- Best For : Rustic or Zen-inspired spaces seeking a natural aesthetic.
- Placement Tip : Position these chimes under trees or pergolas to enhance their organic vibe.
- Glass or Crystal Wind Chimes
- Sound Profile : Delicate tinkling sounds paired with sparkling reflections of sunlight.
- Best For : Cottage-style or whimsical gardens that embrace color and light.
- Placement Tip : Hang glass chimes in sunny spots where they can catch the light and cast rainbows across your garden.
- Customizable or DIY Wind Chimes
- Why It Works : Personalized wind chimes—made from seashells, beads, or recycled materials—add a unique touch to your garden.
- DIY Idea : String together driftwood, sea glass, or old keys for a one-of-a-kind creation.
Benefits of Wind Chimes
- Soothing Sounds : The gentle ringing of wind chimes creates a tranquil environment, perfect for relaxation or meditation.
- Natural Pest Deterrent : Certain frequencies may help deter birds or insects, adding a practical benefit to their beauty.
- Symbolic Meaning : In many cultures, wind chimes are believed to bring good luck, harmony, and positive energy to a space.
The Versatility of Hanging Planters
Hanging planters are a fantastic way to introduce greenery into your garden without sacrificing valuable floor space. They’re especially useful in smaller yards, balconies, or patios where vertical gardening is key.
Types of Hanging Planters
- Macramé Hangers
- Style : Bohemian and artistic, macramé hangers add texture and warmth to any setting.
- Best For : Casual or eclectic gardens with a laid-back vibe.
- Plant Suggestions : Use trailing plants like pothos, ivy, or string of pearls for a cascading effect.
- Metal or Ceramic Pots
- Style : Sleek and polished, these planters suit contemporary or formal gardens.
- Best For : Spaces with clean lines and neutral color palettes.
- Plant Suggestions : Opt for structured plants like ferns, succulents, or geraniums for a tidy appearance.
- Wicker or Rattan Baskets
- Style : Natural and rustic, wicker baskets blend seamlessly with outdoor furniture and wooden accents.
- Best For : Country-style or tropical gardens.
- Plant Suggestions : Fill with colorful annuals like petunias or begonias for a pop of vibrancy.
- Wall-Mounted Planters
- Style : Space-saving and modern, wall-mounted options keep plants at eye level without needing overhead support.
- Best For : Urban gardens or narrow pathways.
- Plant Suggestions : Herbs like basil, mint, or thyme work well here, combining functionality with aesthetics.
Creative Placement Ideas for Hanging Planters
- Under Pergolas or Gazebos : Suspend planters from beams to create a lush canopy effect.
- Along Fences or Walls : Use hooks to line fences with hanging baskets, adding vertical interest.
- Near Entryways : Frame doorways with hanging planters filled with fragrant flowers like lavender or jasmine.
- Above Seating Areas : Hang planters above benches or tables to create a cozy, enclosed feel.
Combining Wind Chimes and Hanging Planters
For maximum impact, consider pairing wind chimes and hanging planters to create a harmonious blend of sight and sound. Here’s how:
- Layer Textures and Heights : Mix tall hanging planters with shorter ones, and intersperse wind chimes at varying levels to create depth.
- Coordinate Colors : Choose planters and chimes in complementary colors—for example, blue glass chimes paired with purple petunias.
- Cluster Them Together : Group several wind chimes and planters in a single area, such as a corner of your patio, to form a mini oasis.
Styling Tips for Maximum Impact
To ensure your wind chimes and hanging planters enhance rather than overwhelm your garden, follow these styling tips:
- Balance Visual Weight : Avoid overcrowding by spacing out your chimes and planters evenly throughout the space.
- Incorporate Seasonal Changes : Swap out seasonal plants in your hanging baskets (e.g., pansies in spring, mums in fall) to keep your garden fresh year-round.
- Use Lighting : Illuminate your hanging planters with solar-powered lights or fairy lights to make them stand out after dark.
DIY Option: Create Your Own Hanging Planter or Wind Chime
If you’re feeling creative, try making your own wind chimes or hanging planters:
- DIY Wind Chime : Collect old silverware, ceramic tiles, or seashells and string them onto fishing line or twine. Attach the strands to a wooden hoop or embroidery ring for a personalized touch.
- DIY Hanging Planter : Upcycle tin cans, mason jars, or coconut shells by painting them and adding drainage holes. Pair them with macramé hangers made from cotton rope.
The Benefits of Adding Wind Chimes and Hanging Planters
By incorporating these elements into your garden, you’ll enjoy a host of benefits:
- Enhanced Ambiance : The combination of soothing sounds and lush greenery creates a multisensory experience.
- Space Optimization : Hanging planters free up floor space, making them ideal for compact gardens.
- Year-Round Appeal : Both wind chimes and evergreen plants provide continuous charm, even during colder months.
With their ability to delight the senses and maximize space, wind chimes and hanging planters are must-haves for any garden. Whether you prefer the melodic tinkling of chimes or the vibrant cascade of trailing plants, these charming additions will breathe life and personality into your backyard oasis.
Use Trellises for Vertical Gardens
When space is limited or when you want to maximize the beauty and functionality of your garden, trellises are an ingenious solution. These versatile structures not only support climbing plants but also serve as stunning vertical accents that add height, texture, and dimension to your outdoor space. Whether you’re aiming to create a lush green wall, define boundaries, or simply enhance the aesthetic appeal of your garden, trellises are an essential tool for crafting a dynamic and visually captivating landscape.
Why Trellises Are Perfect for Vertical Gardens
Trellises are more than just practical supports—they’re design elements that transform flat, unused spaces into thriving vertical gardens. Here’s why they’re a must-have:
- Maximize Space : In small gardens, patios, or balconies, trellises allow you to grow plants vertically, freeing up valuable ground space for other uses.
- Enhance Visual Interest : By drawing the eye upward, trellises break the monotony of horizontal lines and create a layered, multidimensional look.
- Support Climbing Plants : Many plants thrive when given something to climb, such as ivy, clematis, jasmine, or even vegetables like beans and cucumbers. A trellis provides the structure these plants need to flourish.
- Create Privacy : Strategically placed trellises with dense foliage can act as natural screens, shielding your garden from neighbors or unsightly views.
Types of Trellises to Suit Your Garden Style
Trellises come in a variety of materials, shapes, and designs, making it easy to find one that complements your garden’s theme. Here are some popular options:
- Wooden Trellises
- Style : Rustic and natural, wooden trellises blend seamlessly with cottage-style or traditional gardens.
- Best For : Supporting flowering vines like roses, wisteria, or morning glories.
- Placement Tip : Use wooden trellises against fences, walls, or as standalone structures in flower beds.
- Metal Trellises
- Style : Sleek and modern, metal trellises often feature intricate patterns or geometric designs.
- Best For : Contemporary gardens or urban patios where clean lines and durability are key.
- Placement Tip : Install metal trellises near entryways or along pathways to create a striking architectural element.
- PVC or Plastic Trellises
- Style : Lightweight and weather-resistant, PVC trellises are ideal for low-maintenance gardens.
- Best For : Vegetable gardens or areas exposed to harsh weather conditions.
- Placement Tip : Use these trellises in vegetable patches to support crops like tomatoes, peas, or squash.
- Living Wall Trellises
- Style : Modular systems designed specifically for vertical gardening, often incorporating built-in planters.
- Best For : Urban spaces or indoor-outdoor transitions where maximizing greenery is essential.
- Placement Tip : Mount living wall trellises on exterior walls or balcony railings to create a lush, vertical oasis.
- DIY Trellises
- Why It Works : Building your own trellis allows you to customize the size, shape, and material to fit your specific needs.
- DIY Idea : Create a simple trellis using bamboo stakes tied together with twine, or repurpose old ladders, pallets, or wire mesh for a rustic look.
Creative Ways to Use Trellises in Your Garden
Trellises are incredibly versatile and can be used in countless ways to enhance your outdoor space. Here are some creative ideas:
- Define Garden Zones
- Use trellises as partitions to separate different areas of your garden, such as dining spaces, lounging areas, or vegetable patches. Pair them with climbing plants to create natural dividers.
- Frame Entryways
- Place arched or rectangular trellises at the entrance to your garden or patio. Train climbing flowers like jasmine or honeysuckle to grow over the frame, creating a fragrant and inviting gateway.
- Add Privacy
- Install tall trellises along fences or property lines and let dense vines like ivy or bougainvillea grow across them. This creates a natural privacy screen that’s both functional and beautiful.
- Grow Edible Gardens Vertically
- Use trellises to grow vertical vegetable gardens, especially for plants like cucumbers, beans, or melons. This not only saves space but also makes harvesting easier.
- Create Living Art
- Treat your trellis as a canvas by training plants to grow in specific patterns or shapes. For example, use espalier techniques to train fruit trees against a trellis for a sculptural effect.
Choosing the Right Plants for Your Trellis
The success of your vertical garden depends largely on selecting the right plants for your trellis. Here are some popular options categorized by their characteristics:
- Flowering Vines
- Examples: Clematis, climbing roses, morning glories, and sweet peas.
- Benefits: Add bursts of color and fragrance to your garden.
- Evergreen Vines
- Examples: Ivy, creeping fig, and star jasmine.
- Benefits: Provide year-round greenery and privacy.
- Edible Vines
- Examples: Cucumbers, pole beans, peas, and grapes.
- Benefits: Combine beauty with functionality, offering fresh produce while saving space.
- Fast-Growing Vines
- Examples: Hyacinth bean, black-eyed Susan vine, and nasturtium.
- Benefits: Quickly cover trellises, making them ideal for instant impact.
Tips for Installing and Maintaining Trellises
To ensure your trellis remains sturdy and effective, follow these tips:
- Secure Properly : Anchor trellises firmly into the ground or attach them securely to walls or fences to prevent tipping or damage during strong winds.
- Choose the Right Location : Place trellises where plants will receive adequate sunlight and airflow, based on their growing requirements.
- Train Plants Early : Gently guide young vines onto the trellis using soft ties or clips to encourage upward growth.
- Prune Regularly : Trim back overgrown plants to maintain the shape and health of your vertical garden.
DIY Option: Build Your Own Trellis
If you’re feeling crafty, building your own trellis is a rewarding project that adds a personal touch to your garden. Here are some ideas:
- Simple Wooden Frame : Nail together two vertical posts and crossbeams to form a basic grid. Paint or stain it to match your garden’s aesthetic.
- Repurposed Materials : Use old window frames, lattice panels, or metal grids as ready-made trellises.
- Vertical Planter Trellis : Attach small pots or pouches to a wooden frame to create a combination trellis and planter for herbs or succulents.
The Benefits of Using Trellises
Incorporating trellises into your garden offers numerous advantages:
- Space Efficiency : Vertical gardening maximizes every inch of available space, making it perfect for small yards or urban settings.
- Improved Air Circulation : Elevating plants off the ground reduces the risk of soil-borne diseases and promotes healthier growth.
- Aesthetic Appeal : Trellises add architectural interest and create a sense of depth and movement in your garden.
- Eco-Friendly Solutions : Growing plants vertically can help insulate walls, reduce noise, and improve air quality.
By thoughtfully integrating trellises into your garden design, you can create a lush, functional, and visually stunning outdoor space. Whether you’re cultivating flowers, vegetables, or greenery, trellises offer endless possibilities for transforming your backyard into a true oasis.
Lighting and Ambiance for Evening Enjoyment
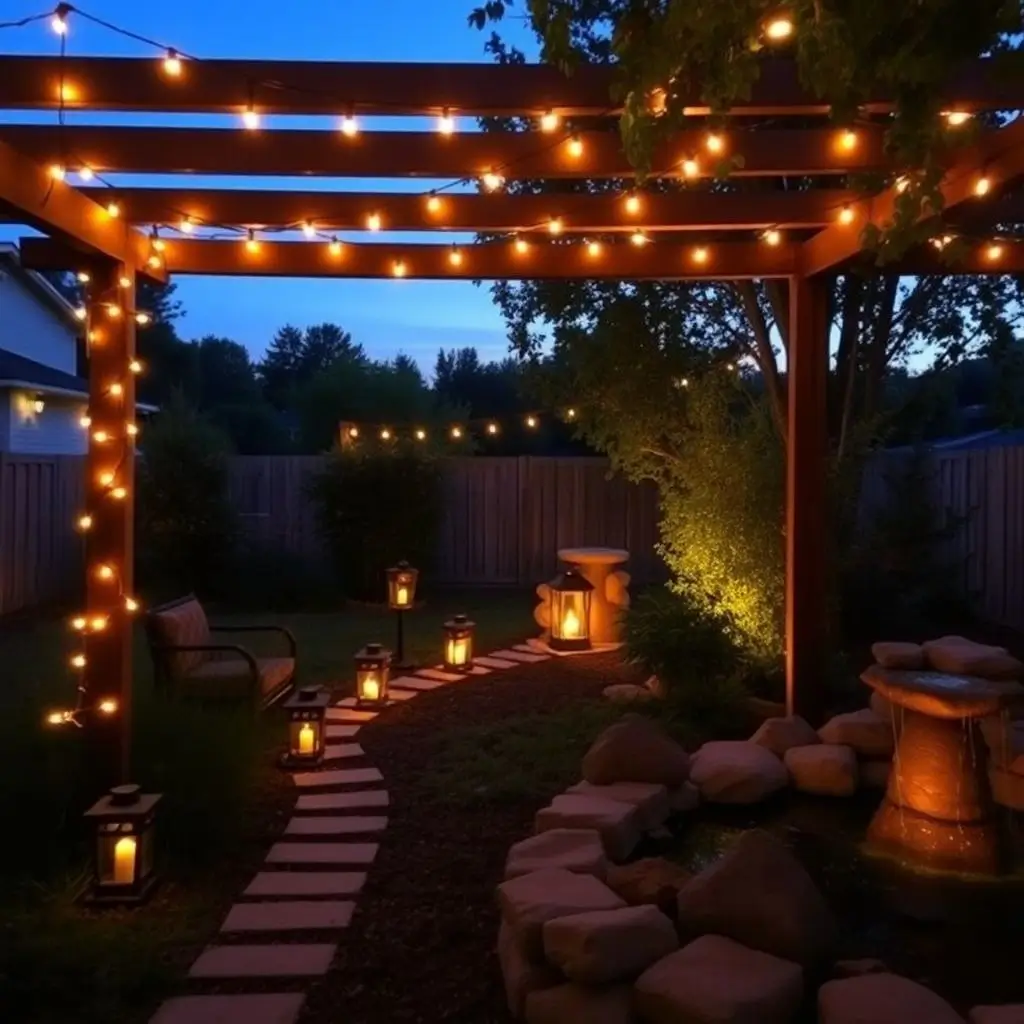
Illuminate with Solar-Powered Lights
When the sun sets, your garden doesn’t have to fade into darkness. With solar-powered lights , you can transform your outdoor space into a magical nighttime retreat that’s both functional and enchanting. These eco-friendly lighting solutions are easy to install, cost-effective, and versatile enough to suit any garden style. Whether you’re looking to highlight pathways, create a cozy ambiance, or add a touch of whimsy, solar-powered lights are the perfect way to bring your garden to life after dark.
Why Choose Solar-Powered Lights?
Solar-powered lights are more than just a trendy choice—they’re a practical and sustainable solution for illuminating your outdoor space. Here’s why they’re a smart addition to your garden:
- Energy Efficiency : Powered by sunlight, these lights reduce electricity costs and minimize your carbon footprint.
- Easy Installation : No wiring or electrical expertise is required—simply place them in sunny spots during the day, and they’ll automatically light up at night.
- Versatility : Available in a wide range of styles, sizes, and designs, solar lights can be used to enhance any area of your garden, from pathways to flower beds.
- Low Maintenance : Most solar lights are weather-resistant and require minimal upkeep, making them ideal for busy gardeners.
Types of Solar-Powered Lights
From subtle accents to bold statements, there’s a solar light for every purpose and aesthetic. Here are some popular options:
- Pathway Lights
- Style : Classic and functional, pathway lights are designed to line walkways, driveways, or garden edges.
- Best For : Creating safe navigation routes while adding a warm glow to your garden.
- Placement Tip : Space them evenly along pathways or stairs to ensure consistent illumination.
- String Lights
- Style : Festive and versatile, string lights drape beautifully across pergolas, fences, or trees.
- Best For : Adding a cozy, romantic ambiance to patios, gazebos, or seating areas.
- Placement Tip : Hang them overhead or weave them through branches for a twinkling effect.
- Spotlights
- Style : Bright and directional, spotlights are perfect for highlighting specific features like statues, water fountains, or architectural elements.
- Best For : Drawing attention to focal points and creating dramatic contrasts.
- Placement Tip : Position them at ground level and angle them upward for maximum impact.
- Lanterns and Hanging Lights
- Style : Elegant and decorative, lanterns add charm when hung from hooks, tree branches, or pergola beams.
- Best For : Rustic or bohemian-themed gardens seeking a vintage or eclectic look.
- Placement Tip : Cluster multiple lanterns together or scatter them throughout your garden for a layered effect.
- Stake Lights
- Style : Compact and portable, stake lights are ideal for embedding in flower beds, borders, or grassy areas.
- Best For : Accentuating plants, shrubs, or garden sculptures with soft, diffused light.
- Placement Tip : Arrange them around the base of trees or along garden edges for subtle highlights.
- Floating Lights
- Style : Unique and eye-catching, floating lights bob gently on the surface of ponds, birdbaths, or water features.
- Best For : Adding a serene, reflective glow to aquatic elements.
- Placement Tip : Use them in calm, still water to maximize their shimmering effect.
Creative Ways to Use Solar-Powered Lights
The versatility of solar lights allows you to get creative with how you illuminate your garden. Here are some inspiring ideas:
- Create a Fairy-Tale Pathway
- Line your garden paths with solar pathway lights or embed small stake lights among pebbles or mulch for a magical, storybook feel.
- Highlight Water Features
- Use floating lights or underwater spotlights to illuminate fountains, ponds, or cascading waterfalls, enhancing their soothing presence.
- Drape String Lights Over Outdoor Spaces
- Wrap string lights around pergola beams, drape them across fences, or hang them above dining areas to create an inviting atmosphere for evening gatherings.
- Accentuate Garden Sculptures or Focal Points
- Place solar spotlights near statues, trellises, or unique plants to make them stand out as nighttime showpieces.
- Add Ambiance to Trees
- Wrap fairy lights around tree trunks or drape them through branches to mimic fireflies dancing in the breeze.
- Design a Moonlit Seating Area
- Surround benches, hammocks, or lounge chairs with lanterns, stake lights, or string lights to create a cozy nook perfect for stargazing or late-night relaxation.
Tips for Maximizing the Effectiveness of Solar Lights
To ensure your solar-powered lights perform optimally and enhance your garden’s beauty, keep these tips in mind:
- Choose Sunny Spots : Place solar panels in areas that receive direct sunlight for at least 6–8 hours a day to ensure they charge fully.
- Clean Panels Regularly : Dust and debris can block sunlight, so wipe the panels clean periodically to maintain efficiency.
- Experiment with Placement : Test different locations to find the most visually appealing arrangement before finalizing their positions.
- Mix and Match Styles : Combine various types of solar lights (e.g., string lights and stake lights) to create layers of illumination.
DIY Option: Customize Your Solar Lights
If you’re feeling crafty, you can personalize your solar lights to match your garden’s theme:
- Paint Mason Jars : Place small solar lights inside painted mason jars to create charming lanterns.
- Decorate with Ribbons or Twine : Wrap ribbons, burlap, or twine around string lights or lanterns for a rustic touch.
- Repurpose Containers : Turn old tin cans, glass bottles, or terracotta pots into unique solar-powered lanterns by inserting small solar stakes.
The Benefits of Using Solar-Powered Lights
Incorporating solar-powered lights into your garden offers a host of benefits:
- Eco-Friendly Lighting : Harness the power of the sun to reduce energy consumption and environmental impact.
- Enhanced Safety : Illuminate dark corners, steps, or pathways to prevent trips and falls.
- Year-Round Appeal : Solar lights work in all seasons, providing consistent charm whether it’s summer evenings or winter nights.
- Budget-Friendly : Once purchased, solar lights require no ongoing electricity costs, making them a cost-effective choice.
By thoughtfully integrating solar-powered lights into your garden design, you can extend its usability and beauty well into the evening hours. Whether you’re aiming for a softly lit sanctuary or a vibrant nighttime wonderland, these lights will help you achieve the perfect balance of functionality and flair.
String Lights for a Cozy Atmosphere
There’s something undeniably magical about the warm, twinkling glow of string lights. Whether draped across a pergola, wrapped around tree branches, or hung along a fence, these versatile lighting fixtures have the power to transform any outdoor space into a cozy, inviting retreat. String lights are more than just a decorative element—they create an ambiance that encourages relaxation, connection, and joy. Perfect for intimate gatherings, romantic evenings, or quiet nights under the stars, string lights are a must-have for anyone looking to elevate their garden’s nighttime charm.
Why String Lights Are Essential for Outdoor Spaces
String lights are beloved for their ability to blend functionality with aesthetics. Here’s why they’re a staple in garden décor:
- Versatility : From rustic to modern, string lights come in a variety of styles, lengths, and bulb shapes, making them suitable for any theme or occasion.
- Warmth and Ambiance : The soft, diffused glow of string lights creates an inviting atmosphere that feels both cozy and enchanting.
- Easy Installation : Unlike permanent lighting solutions, string lights are simple to hang, adjust, and remove, offering flexibility for seasonal changes or special events.
- Budget-Friendly : Affordable and widely available, string lights provide maximum impact without breaking the bank.
Types of String Lights to Suit Your Garden Style
The right type of string light can enhance your garden’s personality and complement its design. Here are some popular options:
- Edison Bulb String Lights
- Style : Vintage-inspired with exposed filaments, these bulbs exude a timeless, industrial charm.
- Best For : Rustic or farmhouse-style gardens, patios, or dining areas.
- Placement Tip : Hang them above outdoor tables or seating areas to create a chic, café-like vibe.
- Fairy Lights
- Style : Delicate and whimsical, fairy lights feature tiny bulbs that emit a subtle, sparkling glow.
- Best For : Romantic or enchanted-themed gardens, especially when wrapped around trees or woven through shrubs.
- Placement Tip : Drape them along fences, railings, or pergolas for a dreamy effect.
- LED String Lights
- Style : Energy-efficient and long-lasting, LED string lights are available in various colors and brightness levels.
- Best For : Modern gardens or spaces where durability and versatility are key.
- Placement Tip : Use colored LED lights for festive occasions or white LEDs for everyday elegance.
- Solar-Powered String Lights
- Style : Eco-friendly and wireless, these lights charge during the day and illuminate at night.
- Best For : Gardens without easy access to electrical outlets or eco-conscious homeowners.
- Placement Tip : Wrap them around tree trunks, drape them over archways, or line pathways for a sustainable glow.
- Globe String Lights
- Style : Featuring round, opaque bulbs, globe lights offer a retro yet sophisticated look.
- Best For : Backyard parties, outdoor kitchens, or large open spaces.
- Placement Tip : Stretch them across open areas like lawns or decks to create a canopy of light.
Creative Ways to Use String Lights in Your Garden
String lights are incredibly adaptable, allowing you to experiment with placement and design. Here are some creative ideas to inspire you:
- Create a Twinkling Canopy
- Drape string lights across the top of a pergola, gazebo, or between trees to form a glowing ceiling. This setup is perfect for hosting dinners or lounging under the stars.
- Wrap Trees and Shrubs
- Wind string lights around tree trunks or weave them through branches to mimic fireflies dancing in the foliage. This technique works especially well for deciduous trees with sparse leaves.
- Outline Structures
- Use string lights to trace the outline of architectural features like gazebos, fences, or garden sheds, adding definition and drama to their silhouettes.
- Illuminate Pathways
- Hang string lights low along garden paths or wrap them around stakes to guide guests safely while creating a welcoming glow.
- Add Sparkle to Water Features
- Drape waterproof string lights around fountains, ponds, or birdbaths to reflect shimmering light off the water’s surface.
- Design a Festive Archway
- Create a glowing entrance by draping string lights over an arbor or gate, turning it into a magical portal to your garden oasis.
- Accentuate Seating Areas
- Frame outdoor furniture or hammocks with string lights to create a cozy nook perfect for reading, chatting, or enjoying a glass of wine.
Tips for Installing and Styling String Lights
To ensure your string lights look their best and last for years, follow these practical tips:
- Choose the Right Length : Measure the area where you plan to hang the lights to avoid running out of length or having excess slack.
- Secure Them Safely : Use weatherproof hooks, clips, or zip ties to attach string lights securely without damaging surfaces or plants.
- Layer Lighting : Combine string lights with other light sources, such as lanterns or solar-powered spotlights, for a layered, multidimensional effect.
- Experiment with Patterns : Try zigzagging, crisscrossing, or cascading patterns to add visual interest and texture.
- Consider Dimmers : Opt for string lights with dimmer switches to adjust brightness based on the mood or occasion.
DIY Option: Personalize Your String Light Setup
If you’re feeling creative, you can customize your string lights to make them uniquely yours:
- Add Decorative Covers : Slide colorful paper lanterns, glass jars, or fabric pom-poms over the bulbs for a personalized touch.
- Paint Mason Jars : Place small sections of string lights inside painted mason jars and hang them as lanterns for a rustic look.
- Create a DIY Light Curtain : Attach string lights to a wooden frame or PVC pipes to form a freestanding curtain of light.
The Benefits of Using String Lights
Incorporating string lights into your garden offers numerous advantages:
- Enhanced Ambiance : Their soft glow instantly transforms any space into a warm, inviting haven.
- Increased Usability : By extending the usability of your outdoor space into the evening, string lights allow you to enjoy your garden longer.
- Versatile Décor : Suitable for year-round use, string lights can be adapted for holidays, parties, or everyday enjoyment.
- Affordable Elegance : They provide high visual impact at a fraction of the cost of permanent lighting installations.
By thoughtfully integrating string lights into your garden design, you can create a cozy atmosphere that invites relaxation, sparks joy, and enhances the beauty of your outdoor space. Whether you’re aiming for a romantic hideaway or a lively entertainment hub, string lights will help you achieve the perfect balance of warmth and charm.
nstall Water Features with Built-In Lighting
Water features are a timeless addition to any garden, offering a sense of tranquility and natural beauty. When paired with built-in lighting, they become even more enchanting, transforming your outdoor space into a mesmerizing nighttime retreat. The combination of flowing water and soft illumination creates a sensory experience that captivates the eye and soothes the soul. Whether you’re envisioning a serene pond, a bubbling fountain, or a cascading waterfall, incorporating water features with built-in lighting can elevate your garden’s ambiance and make it a true oasis.
Why Choose Water Features with Built-In Lighting?
Adding water features with built-in lighting is more than just a decorative choice—it’s a way to enhance both the functionality and aesthetic appeal of your garden. Here’s why this pairing is so impactful:
- Enhanced Visual Appeal : Lighting highlights the movement and texture of water, creating dynamic reflections and shimmering effects that draw attention.
- Extended Enjoyment : With built-in lighting, you can enjoy your water feature well into the evening, extending its usability beyond daylight hours.
- Mood Enhancement : The gentle sound of flowing water combined with soft lighting creates a calming atmosphere, perfect for relaxation or meditation.
- Increased Property Value : A beautifully lit water feature adds curb appeal and can be a standout feature in your landscape design.
Types of Water Features with Built-In Lighting
There’s a wide variety of water features available, each offering unique benefits and styles. Here are some popular options:
- Fountains
- Style : Available in tiered, bowl, or spout designs, fountains range from classic to contemporary.
- Best For : Small gardens, patios, or entryways where a compact yet striking focal point is needed.
- Lighting Options : LED lights embedded in the base or jets illuminate the water as it flows, creating a captivating display.
- Ponds
- Style : Naturalistic ponds mimic the look of a serene lake, often surrounded by rocks, plants, and fish.
- Best For : Larger gardens or backyards seeking a peaceful, Zen-like atmosphere.
- Lighting Options : Submersible lights placed underwater highlight aquatic plants, fish, or the edges of the pond, adding depth and dimension.
- Waterfalls
- Style : Cascading waterfalls can be standalone structures or integrated into ponds, rockeries, or retaining walls.
- Best For : Gardens with slopes or uneven terrain, where waterfalls can add drama and flow.
- Lighting Options : Spotlights or strip lights positioned behind or along the waterfall create a shimmering curtain of light.
- Birdbaths with Lights
- Style : Functional and decorative, birdbaths attract wildlife while doubling as garden art.
- Best For : Compact spaces or areas near seating zones where birds can be observed up close.
- Lighting Options : Solar-powered lights embedded in the base or rim provide subtle illumination without detracting from the birdbath’s charm.
- Wall-Mounted Water Features
- Style : Sleek and space-saving, these features attach to walls or fences and often include minimalist designs.
- Best For : Urban gardens, balconies, or small patios where floor space is limited.
- Lighting Options : Integrated LED strips or spotlights accentuate the water’s movement and the feature’s architectural details.
Creative Ways to Use Water Features with Built-In Lighting
The versatility of illuminated water features allows you to incorporate them into almost any part of your garden. Here are some creative ideas to inspire you:
- Create a Focal Point
- Place a tiered fountain or cascading waterfall at the center of your garden to serve as a stunning visual anchor. The built-in lighting ensures it remains a focal point even after dark.
- Frame Entryways
- Install a wall-mounted water feature with lighting near your front door or garden gate to greet visitors with a welcoming glow and soothing sounds.
- Highlight Garden Pathways
- Line pathways with small illuminated fountains or birdbaths to guide guests through your garden while adding interest and charm.
- Add Drama to Seating Areas
- Position a pond or waterfall near your patio or outdoor lounge area to create a relaxing backdrop for evening gatherings.
- Design a Reflective Pool
- Incorporate a shallow reflective pool with underwater lights to mirror the night sky or surrounding greenery, creating a tranquil, meditative space.
- Combine with Plants
- Surround your water feature with lush greenery or flowering plants, using lighting to highlight both the water and the foliage for a layered effect.
Tips for Installing and Styling Water Features with Lighting
To ensure your water feature looks stunning and functions smoothly, follow these practical tips:
- Choose Energy-Efficient Lighting : Opt for LED or solar-powered lights to reduce energy consumption and maintenance costs.
- Position Strategically : Place the water feature where it can be enjoyed from key vantage points, such as seating areas, windows, or patios.
- Layer the Lighting : Combine different types of lighting (e.g., underwater lights, spotlights, and ambient string lights) to create depth and drama.
- Consider Sound Placement : Ensure the soothing sound of water reaches areas where you spend the most time, like dining spaces or lounging zones.
- Maintain Regularly : Keep the water clean and free of debris to prevent algae buildup and ensure the lighting shines brightly.
DIY Option: Build Your Own Illuminated Water Feature
If you’re feeling adventurous, you can create your own custom water feature with built-in lighting:
- DIY Fountain : Use a large ceramic pot or terracotta bowl as the basin, and install a submersible pump with LED lights for a simple yet elegant fountain.
- Mini Pond : Dig a shallow hole, line it with a waterproof membrane, and add a small pump with underwater lights to create a DIY pond.
- Wall Fountain : Attach a sheet of stone or metal to a wall, and embed a recirculating pump with LED strips to create a sleek, modern design.
The Benefits of Water Features with Built-In Lighting
Incorporating water features with built-in lighting into your garden offers numerous advantages:
- Sensory Experience : The combination of sight and sound creates a multisensory environment that promotes relaxation and mindfulness.
- Year-Round Beauty : Even during colder months, illuminated water features remain visually striking and inviting.
- Wildlife Attraction : Lighted ponds and birdbaths attract birds, butterflies, and other wildlife, enhancing biodiversity in your garden.
- Low Maintenance : Modern water features with built-in lighting are designed for ease of use, requiring minimal upkeep while delivering maximum impact.
By thoughtfully integrating water features with built-in lighting into your garden design, you can create a space that feels magical and serene, day or night. Whether you’re aiming for a tranquil Zen garden or a vibrant entertainment hub, these features will add elegance, charm, and a touch of wonder to your outdoor oasis.
DIY Garden Décor Projects for Personalization
Upcycle Old Furniture into Unique Pieces
In the world of garden décor, creativity and sustainability often go hand in hand. One of the most rewarding ways to add personality and charm to your outdoor space is by upcycling old furniture into unique, one-of-a-kind pieces. Whether you’re repurposing an old chair, table, or cabinet, upcycling not only breathes new life into forgotten items but also reduces waste and adds a personal touch to your garden. With a little imagination and some DIY effort, you can transform discarded furniture into functional art that reflects your style and enhances your backyard oasis.
Why Upcycle Old Furniture for Your Garden?
Upcycling is more than just a trend—it’s a sustainable and budget-friendly way to create custom décor that stands out. Here’s why it’s worth considering:
- Eco-Friendly : By reusing materials, you reduce landfill waste and minimize your environmental footprint.
- Cost-Effective : Transforming something you already own or sourcing secondhand furniture is far cheaper than buying new pieces.
- Unique Results : Upcycled furniture ensures your garden has a distinct look that no store-bought item can replicate.
- Creative Outlet : The process of upcycling allows you to express your creativity and experiment with colors, textures, and designs.
Types of Old Furniture Perfect for Upcycling
Almost any piece of furniture can be repurposed for the garden with a bit of ingenuity. Here are some common items and ideas for their transformation:
- Old Chairs
- Repurpose Ideas : Turn a broken chair into a quirky plant stand by removing the seat and replacing it with a flower pot. Alternatively, paint an old wooden chair in bold colors and use it as a standalone garden sculpture.
- Dressers or Cabinets
- Repurpose Ideas : Remove the drawers from an old dresser and stack them vertically to create tiered planters. Or, repaint a weathered cabinet and use it as a stylish outdoor storage unit for gardening tools or cushions.
- Tables
- Repurpose Ideas : Convert an old table into a mini herb garden by adding soil and planting directly into its surface. Alternatively, flip a table upside down and use it as a trellis for climbing plants.
- Ladders
- Repurpose Ideas : Lean an old wooden ladder against a wall and use its rungs to display potted plants or hanging baskets. You can also paint it in vibrant hues for added visual interest.
- Headboards and Footboards
- Repurpose Ideas : Use an ornate headboard as a garden archway by securing it to posts and training vines to grow over it. Alternatively, mount a footboard horizontally on a fence to create a unique shelf for small pots or garden accessories.
- Doors
- Repurpose Ideas : Hang an old door vertically to serve as a backdrop for a vertical garden or lean it against a wall as a decorative element. Add hooks to turn it into a functional coat rack for outdoor gear.
Creative Ways to Use Upcycled Furniture in Your Garden
The possibilities for upcycling furniture are endless, limited only by your imagination. Here are some inspiring ideas to spark your creativity:
- Create a Boho Seating Area
- Paint mismatched chairs and benches in bright colors or pastel tones and arrange them around a repurposed table for a bohemian-inspired seating area. Add cushions and throws for extra comfort.
- Build a Vertical Planter Wall
- Attach old shutters, pallets, or cabinet doors to a fence or wall and attach small pots or containers to create a lush vertical garden.
- Design a Rustic Bar Cart
- Transform an old cart or trolley into a mobile bar station for outdoor entertaining. Add shelves for drinks, glassware, and snacks, and decorate it with fairy lights for ambiance.
- Turn a Bench into a Planter
- Hollow out the seat of an old bench and fill it with soil to create a built-in planter. Surround it with greenery or flowers for a seamless blend of functionality and beauty.
- Make a Statement with a Repurposed Door
- Lean a painted or distressed door against a fence or wall and hang small shelves or hooks on it to display potted plants, lanterns, or garden tools.
- Add Whimsy with a Tire Swing
- Paint an old tire in bold colors, attach sturdy ropes, and hang it from a tree branch to create a playful swing that doubles as garden art.
Tips for Successful Upcycling Projects
To ensure your upcycled furniture looks polished and performs well in an outdoor setting, follow these tips:
- Choose Durable Materials : Opt for furniture made from wood, metal, or other weather-resistant materials that can withstand the elements.
- Prep Thoroughly : Sand down rough edges, remove rust, and clean surfaces before starting your project to ensure a smooth finish.
- Use Outdoor-Friendly Paints : Select paints or sealants designed for outdoor use to protect your creations from rain, sun, and humidity.
- Add Functional Features : Incorporate practical elements like drainage holes for planters or weatherproof cushions for seating to enhance usability.
- Experiment with Colors and Textures : Don’t be afraid to mix and match colors, patterns, or finishes to make your pieces truly unique.
DIY Option: Step-by-Step Guide to Upcycling a Piece of Furniture
If you’re new to upcycling, here’s a simple project to get you started:
- Choose Your Furniture : Find an old wooden chair, bench, or table at a thrift store, garage sale, or in your attic.
- Clean and Prep : Remove any dirt, grime, or old paint using sandpaper or a scraper.
- Paint or Stain : Apply a fresh coat of outdoor paint in your desired color. For a distressed look, lightly sand the edges after painting.
- Add Decorative Elements : Stencil patterns, add mosaic tiles, or attach hardware like knobs or hooks for extra flair.
- Seal It : Finish with a waterproof sealant to protect the piece from the elements.
- Place Strategically : Position your upcycled creation in your garden where it can shine—whether as a planter, seating, or décor.
The Benefits of Upcycling Old Furniture
Incorporating upcycled furniture into your garden offers numerous advantages:
- Sustainability : Reduces waste and promotes eco-conscious living.
- Personalization : Allows you to create pieces that reflect your personality and style.
- Budget-Friendly : Saves money compared to purchasing new garden furniture or décor.
- Conversation Starters : Unique, handmade pieces often become talking points for guests and visitors.
By thoughtfully upcycling old furniture, you can create a garden that’s not only beautiful but also meaningful and environmentally responsible. Whether you’re crafting a whimsical planter, a cozy seating area, or a striking focal point, upcycled furniture adds character and charm to your outdoor space, making it truly one of a kind.
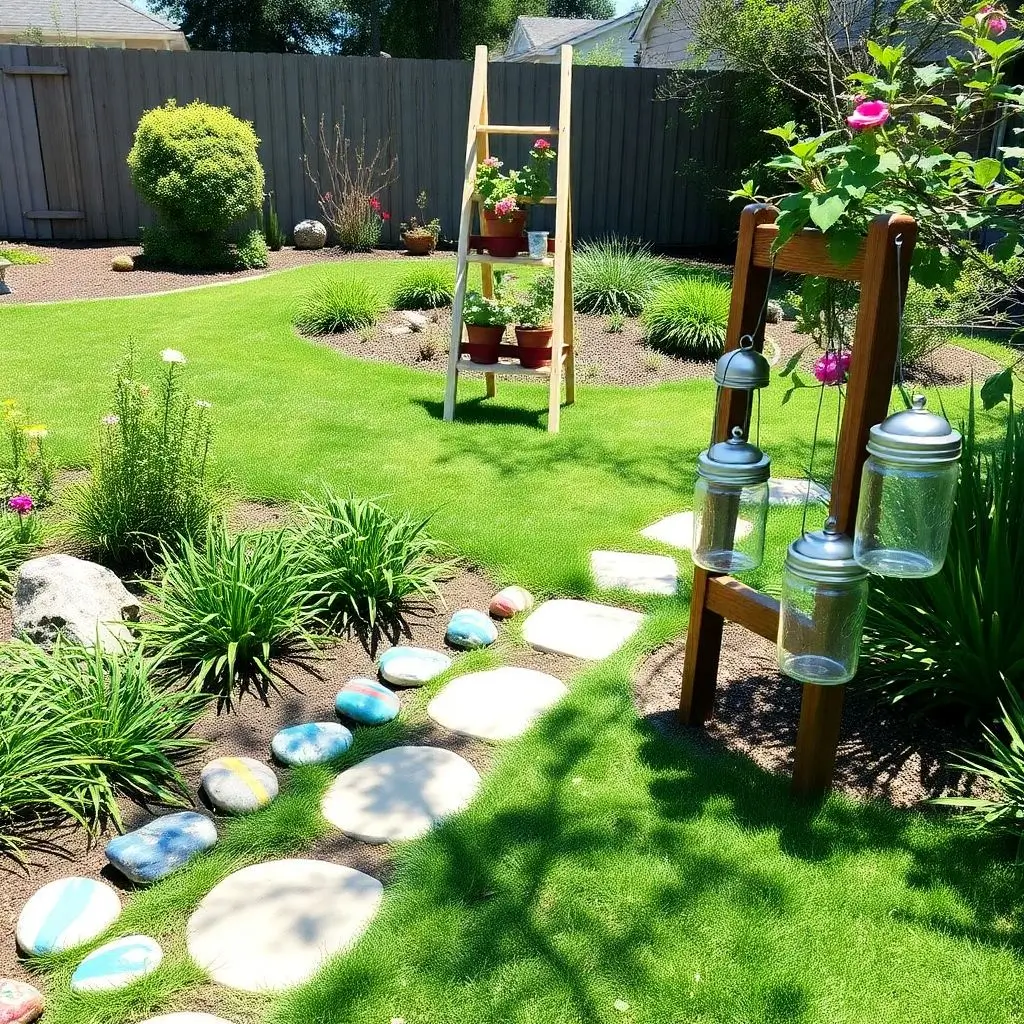
Painted Rocks and Stones for Pathways
Adding painted rocks and stones to your garden pathways is a simple yet impactful way to infuse creativity, color, and personality into your outdoor space. These small, artistic touches can transform an ordinary path into a whimsical or meaningful journey through your garden. Whether you’re looking to create a playful theme, share inspiring messages, or simply add visual interest, painted rocks and stones are versatile, budget-friendly, and easy to incorporate into any garden design.
Why Use Painted Rocks and Stones in Your Garden?
Painted rocks and stones offer a unique blend of functionality and artistry, making them a favorite among DIY enthusiasts and gardeners alike. Here’s why they’re a fantastic addition to your pathways:
- Personal Expression : Painting rocks allows you to showcase your creativity, whether it’s through intricate designs, motivational quotes, or family names.
- Affordable Décor : Rocks and stones are often free or inexpensive to source, and painting them requires minimal supplies.
- Low Maintenance : Once painted and sealed, these stones are durable and can withstand weather conditions, making them ideal for outdoor use.
- Interactive Element : For families with children, painted rocks can double as scavenger hunt items or storytelling prompts, adding an element of fun to the garden.
Types of Designs for Painted Rocks and Stones
The possibilities for designing painted rocks are endless, limited only by your imagination. Here are some popular ideas to inspire you:
- Nature-Inspired Designs
- Examples : Leaves, flowers, butterflies, bees, or ladybugs.
- Best For : Cottage-style gardens or spaces with a natural, earthy vibe.
- Placement Tip : Scatter these rocks along pathways or nestle them among flower beds to blend seamlessly with the surroundings.
- Inspirational Quotes or Words
- Examples : Short phrases like “Breathe,” “Dream Big,” or “Gratitude.”
- Best For : Meditation gardens or Zen-inspired spaces where mindfulness is key.
- Placement Tip : Place these rocks at intervals along the pathway to encourage reflection as you walk.
- Whimsical Patterns and Characters
- Examples : Smiley faces, animals, cartoon characters, or abstract shapes.
- Best For : Playful or themed gardens, especially those enjoyed by children.
- Placement Tip : Group these rocks together in clusters to create moments of discovery and delight.
- Directional Markers or Symbols
- Examples : Arrows, footprints, or symbols like hearts, stars, or suns.
- Best For : Guiding visitors through winding pathways or marking specific areas of the garden.
- Placement Tip : Use these rocks to subtly direct foot traffic or highlight points of interest, such as a seating area or water feature.
- Seasonal Themes
- Examples : Pumpkins for fall, snowflakes for winter, eggs for spring, or sunflowers for summer.
- Best For : Gardens that change with the seasons or celebrate holidays.
- Placement Tip : Swap out seasonal rocks to keep your pathway fresh and festive year-round.
Creative Ways to Incorporate Painted Rocks and Stones
Painted rocks and stones can be used in countless ways to enhance your garden pathways. Here are some creative ideas to try:
- Line the Edges of Pathways
- Arrange painted stones along the borders of your pathway to define its shape and add a pop of color. This works particularly well for gravel, stone, or mulched paths.
- Create a Storytelling Walkway
- Paint a series of rocks with sequential images or words that tell a story as you walk along the path. For example, depict the life cycle of a butterfly or the stages of a sunrise.
- Highlight Specific Areas
- Place painted rocks near focal points like garden statues, fountains, or seating areas to draw attention and add context.
- Add Playful Surprises
- Tuck whimsical or hidden rocks among plants or under benches for visitors to discover as they explore your garden.
- Form Patterns or Shapes
- Arrange rocks in geometric patterns, spirals, or mosaics along the pathway to create visual interest and texture.
- Combine with Other Décor
- Pair painted rocks with other garden accents like wind chimes, lanterns, or trellises to create a cohesive and layered look.
Tips for Painting and Sealing Rocks
To ensure your painted rocks last and look their best outdoors, follow these practical tips:
- Choose Smooth, Flat Rocks : Look for rocks with a smooth surface and minimal cracks for easier painting and better results.
- Clean Before Painting : Wash the rocks thoroughly to remove dirt and debris, then let them dry completely before starting.
- Use Outdoor Paints : Opt for acrylic paints designed for outdoor use, as they adhere better and resist fading.
- Seal with a Protective Coat : Apply a clear, waterproof sealant (such as Mod Podge or spray varnish) to protect the paint from rain, sun, and wear.
- Layer Colors for Depth : Start with a base coat, then add details and highlights for a more professional finish.
DIY Option: Host a Rock-Painting Party
If you’re looking for a fun group activity, consider hosting a rock-painting party with family, friends, or neighbors:
- Materials Needed : Gather smooth rocks, acrylic paints, brushes, and sealant. Provide stencils or templates for beginners.
- Theme Ideas : Choose a theme like “Garden Creatures,” “Positive Affirmations,” or “Seasonal Decorations” to guide participants.
- Placement Plan : After the event, distribute the painted rocks along your garden pathways or gift them to guests as keepsakes.
The Benefits of Using Painted Rocks and Stones
Incorporating painted rocks and stones into your garden offers numerous advantages:
- Enhanced Visual Appeal : Their vibrant colors and designs add charm and character to otherwise plain pathways.
- Encourages Mindfulness : Inspirational quotes or calming designs can turn a simple walk into a reflective experience.
- Family-Friendly Activity : Painting rocks is a fun, hands-on project that kids and adults alike can enjoy together.
- Customizable and Versatile : You can easily update or replace painted rocks to match changing seasons, themes, or moods.
By thoughtfully integrating painted rocks and stones into your garden pathways, you can create a space that feels personal, inviting, and full of life. Whether you’re aiming for a whimsical wonderland, a serene retreat, or a playful hideaway, these small but impactful touches will leave a lasting impression on anyone who walks through your garden.
Build a Rustic Bird Feeder
A rustic bird feeder is more than just a functional addition to your garden—it’s an opportunity to blend artistry, sustainability, and wildlife-friendly design into your outdoor space. By building your own bird feeder, you can create a charming focal point that attracts birds, enhances biodiversity, and adds a touch of handmade charm to your backyard oasis. Whether you’re a seasoned DIY enthusiast or a beginner looking for a simple project, crafting a rustic bird feeder is a rewarding way to connect with nature while personalizing your garden décor.
Why Build a Rustic Bird Feeder?
Adding a bird feeder to your garden offers numerous benefits beyond its aesthetic appeal:
- Attracts Wildlife : A well-placed bird feeder invites colorful songbirds, finches, and other feathered friends to visit your garden, creating opportunities for birdwatching and photography.
- Supports Local Ecosystems : Providing food for birds helps sustain them, especially during colder months when natural resources may be scarce.
- Sustainable Décor : Using reclaimed or natural materials ensures your bird feeder aligns with eco-friendly principles, reducing waste and promoting sustainability.
- Customizable Design : Building your own feeder allows you to tailor its size, style, and functionality to suit your garden’s theme and needs.
Materials for a Rustic Bird Feeder
The beauty of a rustic bird feeder lies in its simplicity and use of natural or repurposed materials. Here are some common materials you can use:
- Reclaimed Wood
- Salvaged from old pallets, crates, or furniture, reclaimed wood adds warmth and texture while giving new life to discarded items.
- Mason Jars or Tin Cans
- These versatile containers can serve as seed holders and add a vintage touch when paired with wooden accents.
- Rope or Twine
- Ideal for hanging feeders from trees or hooks, rope and twine enhance the rustic aesthetic.
- Metal Accents
- Old tin sheets, screws, or hinges can add durability and a weathered look.
- Natural Elements
- Incorporate driftwood, bark, or stones for an earthy, organic feel.
Step-by-Step Guide to Building a Rustic Bird Feeder
Here’s a simple DIY project to create a charming bird feeder using reclaimed wood and basic tools:
Materials Needed:
- Reclaimed wood planks (for the base, roof, and sides)
- Small nails or screws
- Sandpaper
- Waterproof wood glue
- Twine or rope (for hanging)
- Paint or wood stain (optional, for added protection and style)
- Clear sealant (to protect against weather)
Tools Needed:
- Saw (hand saw or power saw)
- Hammer or drill
- Measuring tape
- Paintbrush
Instructions:
- Cut the Wood :
- Cut the reclaimed wood into pieces for the base (approximately 6” x 6”), two side panels (6” tall), a sloped roof (two triangular pieces), and a small perch (a thin dowel or scrap wood).
- Assemble the Frame :
- Attach the side panels to the base using nails or screws. Ensure the structure is sturdy but retains a rustic, handmade look.
- Add the Roof :
- Secure the two triangular roof pieces together at the top, then attach them to the frame. Leave a slight overhang on all sides to protect the feeder from rain.
- Install the Perch :
- Drill a small hole on each side panel near the bottom and insert the dowel or scrap wood to serve as a perch for birds.
- Create a Hanging Mechanism :
- Drill holes at the top corners of the roof and thread twine or rope through them to create a loop for hanging.
- Finish and Protect :
- Sand any rough edges to prevent splinters. If desired, apply a coat of paint or wood stain to match your garden’s theme. Seal the entire feeder with a waterproof varnish to ensure it withstands outdoor conditions.
- Fill and Hang :
- Add birdseed to the base and hang the feeder from a tree branch, pergola, or garden hook where birds can easily access it.
Creative Variations for Rustic Bird Feeders
Once you’ve mastered the basics, you can experiment with different designs to suit your garden’s style:
- Mason Jar Feeder :
- Attach a mason jar upside down to a wooden platform, allowing seeds to dispense through the lid. Surround the jar with reclaimed wood for a rustic frame.
- Log Feeder :
- Drill shallow holes into a piece of driftwood or log and fill them with suet or seed mix. Hang the log horizontally using rope for a natural look.
- Tiered Feeder :
- Stack multiple wooden platforms or trays to create a multi-level feeder that accommodates different types of seeds and attracts a variety of birds.
- Wall-Mounted Feeder :
- Build a compact feeder with a sloped roof and attach it directly to a fence or wall for smaller spaces like patios or balconies.
- Seasonal Themes :
- Decorate your feeder with seasonal motifs, such as painting snowflakes for winter or adding floral accents for spring.
Tips for Attracting Birds to Your Feeder
To make the most of your rustic bird feeder, follow these tips:
- Choose the Right Location : Place the feeder near trees or shrubs to provide birds with cover from predators while ensuring it’s visible and accessible.
- Use Quality Birdseed : Opt for high-quality seeds or blends tailored to the types of birds in your area. Avoid cheap filler seeds that birds may discard.
- Keep It Clean : Regularly clean the feeder to prevent mold or bacteria buildup, which can harm birds.
- Provide Water Nearby : Pair your feeder with a birdbath or water feature to create a complete habitat for visiting birds.
- Be Patient : It may take time for birds to discover your feeder, so keep it consistently stocked and monitor its placement.
DIY Option: Upcycle Household Items into Bird Feeders
If you’re short on materials, consider upcycling everyday items into unique bird feeders:
- Teacups and Saucers : Glue a teacup to a saucer and attach a chain or rope for hanging. Fill the cup with seeds.
- Old Boots or Shoes : Fill a weathered boot with seed mix and hang it upside down by the toe.
- Tin Cans : Decorate empty cans with paint or twine, punch drainage holes in the bottom, and attach them to a wooden plank for a tiered design.
The Benefits of a Rustic Bird Feeder
Incorporating a rustic bird feeder into your garden offers numerous advantages:
- Enhanced Garden Ambiance : The sight and sound of birds bring life and energy to your outdoor space.
- Eco-Friendly Practice : Using reclaimed materials reduces waste and promotes sustainability.
- Educational Opportunity : Watching birds interact with the feeder can be a learning experience for children and adults alike.
- Personal Satisfaction : Building something with your own hands adds a sense of pride and accomplishment to your garden.
Seasonal and Thematic Garden Décor Ideas
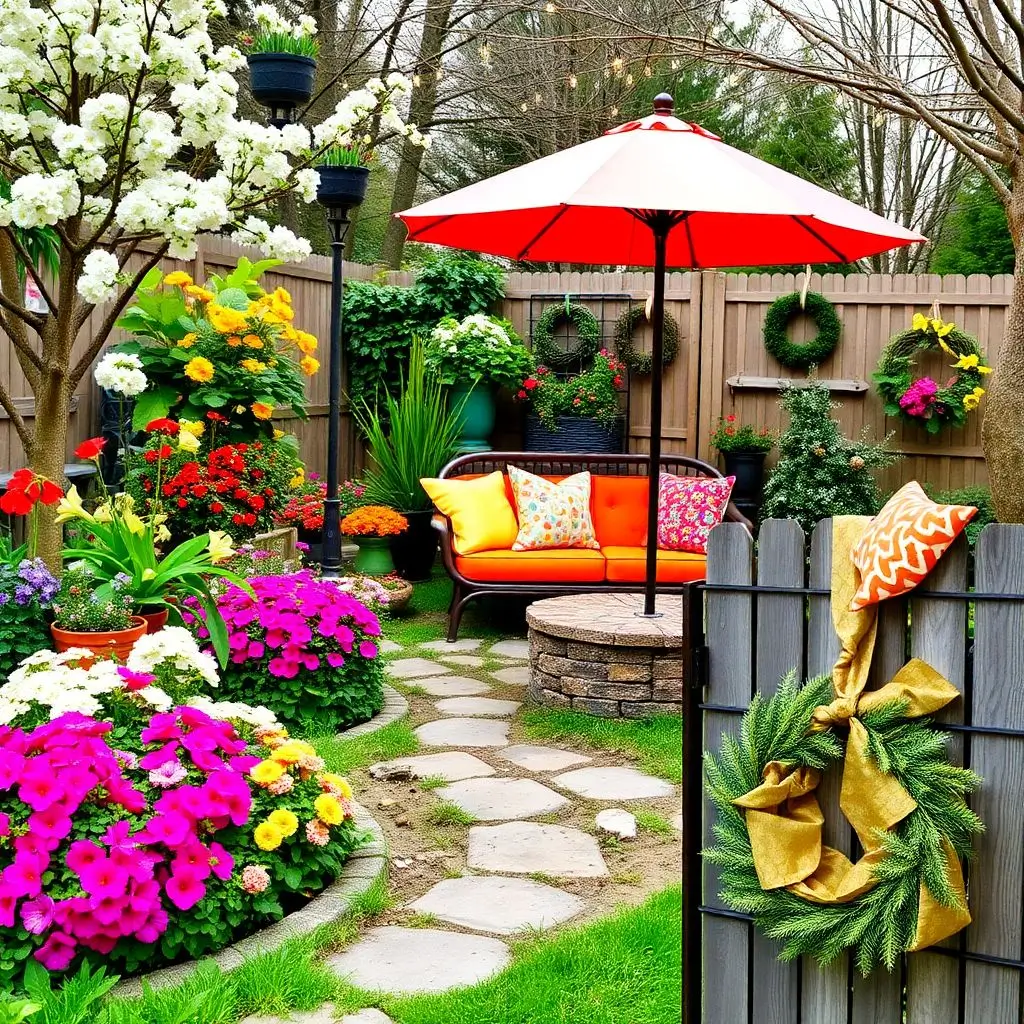
Spring Blooms with Flower Bed Arrangements
Spring is a time of renewal and vibrancy, and there’s no better way to celebrate the season than by creating stunning flower bed arrangements that burst with color, texture, and life. A well-designed flower bed can transform your garden into a breathtaking canvas of blooms, attracting pollinators like bees and butterflies while adding curb appeal to your outdoor space. Whether you’re working with a small patch of soil or a sprawling landscape, thoughtful planning and creative design can help you craft a spring flower bed that’s both beautiful and functional.
Why Focus on Spring Blooms?
Spring flower beds are more than just a seasonal decoration—they’re a celebration of nature’s awakening after winter dormancy. Here’s why they’re worth the effort:
- Instant Curb Appeal : A vibrant flower bed instantly elevates the look of your home, making it feel welcoming and alive.
- Supports Pollinators : Early-blooming flowers provide essential nectar for bees, butterflies, and other beneficial insects as they emerge from hibernation.
- Boosts Mood : The bright colors and fresh scents of spring flowers create a cheerful atmosphere that lifts spirits and invites relaxation.
- Versatile Design Options : From formal borders to wildflower meadows, spring flower beds can be tailored to suit any style or space.
Choosing the Right Flowers for Your Spring Bed
The key to a successful spring flower bed lies in selecting the right combination of plants that thrive in cooler temperatures and bloom early in the season. Here are some popular options categorized by their characteristics:
- Early Bloomers
- Examples : Crocuses, snowdrops, and winter aconites.
- Best For : Adding pops of color as soon as the snow melts.
- Placement Tip : Plant these bulbs in clusters near walkways or entryways for an immediate impact.
- Tulips and Daffodils
- Examples : Darwin tulips, double daffodils, and miniature varieties.
- Best For : Creating bold, structured displays in borders or large beds.
- Placement Tip : Mix different heights and colors for a layered effect, placing taller varieties toward the back and shorter ones in front.
- Perennials for Longevity
- Examples : Pansies, primroses, and hellebores.
- Best For : Low-maintenance gardens where plants return year after year.
- Placement Tip : Use perennials as anchor plants and fill gaps with annuals for added variety.
- Ground Covers
- Examples : Creeping phlox, sweet alyssum, and creeping thyme.
- Best For : Filling empty spaces and preventing weeds while adding texture.
- Placement Tip : Plant ground covers along edges or between stepping stones for a lush, carpet-like effect.
- Wildflowers for a Natural Look
- Examples : California poppies, lupines, and cornflowers.
- Best For : Cottage-style gardens or meadow-inspired designs.
- Placement Tip : Scatter seeds randomly for a carefree, natural appearance.
Creative Ideas for Spring Flower Bed Arrangements
Designing a flower bed is an opportunity to express your creativity and experiment with shapes, colors, and textures. Here are some inspiring ideas to try:
- Color-Themed Beds
- Create a cohesive look by sticking to a specific color palette, such as pastel pinks and purples or bold yellows and oranges.
- Example: Pair yellow daffodils with purple hyacinths for a striking contrast.
- Layered Planting
- Arrange plants in tiers based on height, with tall flowers at the back, medium-height plants in the middle, and low-growing varieties at the front.
- Example: Place foxgloves (tall) behind tulips (medium) and creeping phlox (low).
- Geometric Patterns
- Use geometric shapes like circles, spirals, or checkerboards to add structure and visual interest to your flower bed.
- Example: Alternate rows of white and blue pansies to form a striped pattern.
- Mixed Borders
- Combine flowers, shrubs, and ornamental grasses for a dynamic, multi-textured display.
- Example: Plant lavender alongside daisies and feather reed grass for a fragrant, layered border.
- Container Gardens Within Beds
- Incorporate potted plants or decorative containers into your flower bed for added dimension and flexibility.
- Example: Place a ceramic pot filled with trailing ivy or cascading petunias among ground-level blooms.
- Seasonal Transitions
- Plan your flower bed to evolve throughout spring by layering early, mid, and late-season bloomers.
- Example: Start with crocuses, transition to tulips, and finish with alliums for continuous color.
Tips for Designing and Maintaining a Spring Flower Bed
To ensure your flower bed thrives and looks its best, follow these practical tips:
- Plan Ahead : Sketch out your design before planting, considering factors like sunlight, soil type, and plant spacing.
- Choose Complementary Colors : Use the color wheel to select hues that complement each other, such as analogous colors (next to each other) or complementary colors (opposite each other).
- Prepare the Soil : Amend the soil with compost or organic matter to provide nutrients and improve drainage.
- Mulch Wisely : Apply a thin layer of mulch to retain moisture, suppress weeds, and protect tender roots.
- Deadhead Regularly : Remove spent blooms to encourage continuous flowering and maintain a tidy appearance.
- Water Strategically : Water deeply but infrequently to promote strong root growth, especially during dry spells.
DIY Option: Create a “Bulb Lasagna” Flower Bed
For a show-stopping spring display, try the “bulb lasagna” technique, which layers bulbs at different depths for staggered blooming:
- Materials Needed : Bulbs like tulips, daffodils, and crocuses; potting soil; a spade or trowel.
- Steps :
- Dig a deep hole (about 12 inches).
- Place larger bulbs like tulips at the bottom, cover with soil, then add medium-sized bulbs like daffodils, followed by smaller bulbs like crocuses at the top.
- Backfill with soil and water thoroughly.
- Result : As spring progresses, each layer will bloom in succession, creating a continuous display of color.
By thoughtfully arranging your spring flower beds, you can create a vibrant and harmonious outdoor space that celebrates the joy and energy of the season. Whether you prefer structured borders, whimsical wildflowers, or geometric patterns, these arrangements will bring life, color, and charm to your backyard oasis.
Summer Vibes with Bright Cushions and Umbrellas
Summer is all about vibrant colors, relaxed vibes, and creating an inviting outdoor space where you can soak up the sunshine or enjoy a cool breeze in the shade. One of the easiest and most impactful ways to infuse your garden or patio with summer energy is by incorporating bright cushions and umbrellas . These simple yet transformative additions not only enhance comfort but also inject personality, style, and functionality into your outdoor living areas. Whether you’re aiming for a tropical paradise, a bohemian retreat, or a modern oasis, bright cushions and umbrellas are key to achieving that perfect summer ambiance.
Why Bright Cushions and Umbrellas Are Essential for Summer
Adding pops of color through cushions and umbrellas is more than just a decorative choice—it’s a way to create a lively, welcoming atmosphere that reflects the spirit of the season. Here’s why they’re a must-have:
- Boosts Visual Appeal : Bright colors like sunny yellows, ocean blues, and tropical greens instantly make your outdoor space feel more cheerful and summery.
- Enhances Comfort : Cushions provide plush seating, while umbrellas offer much-needed shade, making your outdoor area more enjoyable during long summer days.
- Easy to Swap Out : Unlike permanent fixtures, cushions and umbrellas can be easily changed or stored away at the end of the season, allowing you to refresh your space effortlessly.
- Versatile Styling : From bold patterns to solid hues, these accessories can complement any garden theme, whether it’s coastal, rustic, or contemporary.
Choosing the Right Cushions for Summer Vibes
The right cushions can transform your outdoor furniture into cozy, stylish lounging spots. Here’s how to select and style them for maximum impact:
- Material Matters
- Best Choices : Opt for weather-resistant fabrics like Sunbrella, polyester, or acrylic that resist fading, moisture, and mildew.
- Avoid : Delicate materials like silk or cotton, which may not hold up well in humid or rainy conditions.
- Color Palette Ideas
- Tropical Theme : Think vibrant oranges, lime greens, turquoise, and coral to evoke island vibes.
- Coastal Chic : Stick to nautical-inspired shades like navy blue, crisp white, and sandy beige.
- Bold and Playful : Mix and match bright primaries (red, yellow, blue) or jewel tones (emerald, sapphire, ruby) for a fun, eclectic look.
- Patterns to Consider
- Stripes : Classic and timeless, striped cushions add a touch of sophistication.
- Florals : Perfect for a garden setting, floral prints bring a fresh, natural feel.
- Geometric Designs : Modern and eye-catching, geometric patterns work well in contemporary spaces.
- Layering for Comfort and Style
- Combine different shapes and sizes, such as square seat cushions, lumbar pillows, and round poufs, to create depth and coziness.
- Add texture with woven or embroidered details for a tactile element.
Selecting the Perfect Umbrella for Shade and Style
Umbrellas do double duty by providing shade and serving as a statement piece in your outdoor décor. Here’s how to choose and style one that fits your summer vision:
- Types of Umbrellas
- Market Umbrellas : Large, wide canopies ideal for dining tables or seating areas.
- Cantilever Umbrellas : Offset designs that provide shade without obstructing views or table space.
- Patio Umbrellas : Smaller options perfect for individual chairs or compact spaces.
- Color and Design Options
- Solid Colors : Choose a single bold hue that matches your cushions for a cohesive look.
- Printed Canopies : Go for stripes, polka dots, or tropical motifs to add visual interest.
- Neutral Tones : If your cushions are already colorful, opt for a neutral umbrella (like beige or gray) to balance the overall aesthetic.
- Functional Features to Look For
- UV Protection : Ensure the fabric blocks harmful UV rays to keep you safe and comfortable.
- Adjustable Tilt : Allows you to angle the umbrella as the sun moves throughout the day.
- Wind Resistance : Look for sturdy frames and vented canopies to withstand breezy conditions.
Creative Ways to Use Bright Cushions and Umbrellas
Here are some ideas to maximize the impact of these summer essentials in your outdoor space:
- Create a Colorful Seating Area
- Arrange bright cushions on lounge chairs, benches, or sofas to define a cozy seating zone. Pair them with a matching umbrella for a cohesive look.
- Add Pops of Color to Neutral Spaces
- If your outdoor furniture is neutral (e.g., white wicker or teak wood), use bold cushions and umbrellas to introduce vibrancy without overwhelming the space.
- Mix and Match for Eclectic Charm
- Combine cushions in varying patterns and colors for a playful, bohemian vibe. For example, pair striped pillows with floral ones and a solid-colored umbrella.
- Define Zones with Umbrellas
- Use umbrellas to delineate specific areas, such as a dining nook or a reading corner, within a larger outdoor space.
- Incorporate Themed Accessories
- Enhance the summer vibe by adding complementary items like patterned throw blankets, colorful rugs, or tropical-themed lanterns.
- Experiment with Placement
- Place umbrellas strategically to frame views, block harsh sunlight, or create intimate conversation areas.
Tips for Maintaining Bright Cushions and Umbrellas
To ensure your summer décor stays vibrant and functional all season long, follow these care tips:
- Clean Regularly : Wipe down umbrella canopies and spot-clean cushions with mild soap and water to remove dirt and stains.
- Store Indoors When Not in Use : Protect cushions and umbrellas from prolonged exposure to rain or extreme heat by storing them indoors overnight or during off-seasons.
- Use Protective Covers : Invest in covers specifically designed for outdoor furniture and umbrellas to extend their lifespan.
- Rotate Cushions : Flip and rotate cushions periodically to prevent uneven fading or wear.
DIY Option: Personalize Your Cushions and Umbrellas
If you’re feeling crafty, you can customize your cushions and umbrellas to make them truly unique:
- Paint or Stencil Designs : Use fabric paint to add hand-painted patterns or stenciled motifs to plain cushions.
- Sew Your Own Covers : Create custom cushion covers using outdoor fabric in your favorite colors and patterns.
- Decorate Umbrella Canopies : Attach removable fabric panels or ribbons to an existing umbrella for a personalized touch.
The Benefits of Using Bright Cushions and Umbrellas
Incorporating bright cushions and umbrellas into your outdoor space offers numerous advantages:
- Enhanced Comfort : Plush cushions and shaded areas make spending time outdoors more enjoyable.
- Increased Usability : A well-styled seating area encourages you to host gatherings, relax solo, or entertain guests.
- Seasonal Refresh : These accessories allow you to update your space quickly and affordably without major renovations.
- Mood Boosting : Vibrant colors and playful patterns evoke happiness and relaxation, perfectly capturing the essence of summer.
By thoughtfully selecting and styling bright cushions and umbrellas, you can create a summer-ready outdoor space that’s both functional and fashionable. Whether you’re aiming for a laid-back beach vibe or a chic alfresco lounge, these elements will help you achieve the ultimate backyard oasis.
Winter Wonderland with Festive Lights and Wreaths
As the days grow shorter and the air turns crisp, transforming your garden into a winter wonderland is a magical way to celebrate the season. With the right combination of festive lights and wreaths , you can create an enchanting outdoor space that feels warm, inviting, and full of holiday cheer—even in the coldest months. These timeless decorations not only brighten up dark winter nights but also add a touch of elegance and charm to your home’s exterior. Whether you’re hosting a holiday gathering or simply enjoying quiet evenings outdoors, festive lights and wreaths are essential for crafting a cozy, seasonal retreat.
Why Use Festive Lights and Wreaths in Winter?
Winter gardens often lack the vibrant colors and lush greenery of other seasons, but festive lights and wreaths can bring life and warmth to even the frostiest landscapes. Here’s why they’re a must-have:
- Brightens Dark Nights : Shorter daylight hours mean darker evenings, and twinkling lights add sparkle and illumination to your outdoor space.
- Creates a Cozy Atmosphere : The soft glow of lights paired with the natural beauty of wreaths evokes feelings of warmth and nostalgia, perfect for the holiday season.
- Enhances Curb Appeal : A well-decorated garden or entryway makes a memorable first impression on guests and neighbors alike.
- Versatile Decorations : Festive lights and wreaths can be adapted for any style, from traditional and rustic to modern and minimalist.
Choosing the Right Festive Lights
Festive lights come in a variety of styles, colors, and designs, making it easy to find options that suit your winter theme. Here’s how to select and use them effectively:
- Types of Festive Lights
- String Lights : Classic and versatile, string lights can be draped along fences, wrapped around trees, or hung across pergolas.
- Best For: Creating a canopy of light or outlining architectural features.
- Icicle Lights : Mimicking the look of icicles, these lights add a whimsical, wintery touch.
- Best For: Eaves, gutters, or rooflines to enhance the snowy aesthetic.
- Net Lights : Perfect for covering large areas like bushes, hedges, or ground coverings.
- Best For: Quick and even illumination without tangling.
- Spotlights : Use spotlights to highlight specific elements like wreaths, statues, or water features.
- Best For: Adding drama and focus to key areas.
- String Lights : Classic and versatile, string lights can be draped along fences, wrapped around trees, or hung across pergolas.
- Color Options
- Warm White : Creates a classic, elegant look that complements any decor.
- Multicolored : Adds playful energy and suits families celebrating holidays like Christmas.
- Blue and Silver : Evokes a frosty, icy vibe ideal for a winter wonderland theme.
- Energy-Efficient Choices
- Opt for LED lights, which are brighter, longer-lasting, and more energy-efficient than traditional incandescent bulbs.
- Consider solar-powered lights for eco-friendly, hassle-free installation.
- Placement Ideas
- Wrap tree trunks and branches with fairy lights to mimic sparkling snow-covered trees.
- Line pathways with lanterns or stake lights to guide visitors safely through your garden.
- Drape lights over archways or pergolas to create a glowing entrance.
Selecting and Styling Festive Wreaths
Wreaths are iconic symbols of the season, adding texture, color, and personality to your outdoor décor. Here’s how to choose and display them creatively:
- Materials and Styles
- Traditional Evergreen Wreaths : Made from pine, cedar, or fir, these classic wreaths evoke the spirit of winter and pair beautifully with red bows or pinecones.
- Best For: Front doors, gates, or fence posts.
- Rustic Wreaths : Incorporate natural elements like burlap, dried oranges, cinnamon sticks, or twigs for a cozy, farmhouse feel.
- Best For: Country-style or woodland-themed gardens.
- Modern Wreaths : Minimalist designs featuring metallic accents, eucalyptus leaves, or geometric shapes suit contemporary spaces.
- Best For: Sleek patios or urban balconies.
- DIY Wreaths : Customize your wreath with seasonal berries, feathers, or ornaments to reflect your personal style.
- Traditional Evergreen Wreaths : Made from pine, cedar, or fir, these classic wreaths evoke the spirit of winter and pair beautifully with red bows or pinecones.
- Placement Tips
- Hang a wreath on your front door as a welcoming centerpiece.
- Attach smaller wreaths to windows, lampposts, or garden gates for added charm.
- Place a wreath above an outdoor fireplace or seating area to anchor the space.
- Adding Finishing Touches
- Enhance wreaths with ribbons, bells, or battery-operated fairy lights for extra sparkle.
- Swap out decorations based on the occasion—red and green for Christmas, silver and gold for New Year’s, or pastels for winter solstice celebrations.
Creative Ways to Combine Lights and Wreaths
The magic truly happens when you combine festive lights and wreaths to create a cohesive winter wonderland. Here are some creative ideas:
- Light-Up Wreaths
- Weave string lights or attach small LED clips into evergreen wreaths for a glowing effect.
- Example: Hang a light-up wreath on your front door and flank it with matching lanterns.
- Twinkling Trees
- Decorate bare trees with string lights and hang wreaths from their branches for a festive forest vibe.
- Pathway Illumination
- Alternate stake lights with small wreaths along garden paths to guide guests with style.
- Festive Archways
- Frame entryways or garden gates with garlands of lights and oversized wreaths for a grand welcome.
- Reflective Surfaces
- Place wreaths near ponds, birdbaths, or mirrors to take advantage of light reflections and amplify their impact.
Tips for Maintaining Your Winter Decorations
To ensure your festive lights and wreaths stay beautiful throughout the season, follow these practical tips:
- Weatherproof Materials : Choose lights and wreaths designed for outdoor use to withstand rain, snow, and wind.
- Secure Installations : Use weather-resistant hooks, zip ties, or adhesive clips to keep decorations firmly in place.
- Check for Safety : Inspect lights for frayed wires or damaged bulbs before hanging, and avoid overloading electrical outlets.
- Refresh Greens Regularly : If using fresh evergreen wreaths, mist them occasionally to prevent drying out, or replace them with faux alternatives if longevity is key.
DIY Option: Create Your Own Festive Decor
If you love hands-on projects, here are some DIY ideas to personalize your winter wonderland:
- Homemade Wreaths :
- Gather pine branches, holly, or eucalyptus and form them into a circular base using floral wire. Add embellishments like ribbon, ornaments, or dried citrus slices.
- Custom Light Garlands :
- String together mason jars filled with fairy lights and hang them along fences or railings for a rustic touch.
- Snow-Covered Accents :
- Spray artificial greenery or pinecones with white paint or glitter to mimic freshly fallen snow.
The Benefits of a Winter Wonderland with Lights and Wreaths
Incorporating festive lights and wreaths into your garden offers numerous advantages:
- Seasonal Transformation : Instantly elevates your outdoor space, making it feel festive and inviting.
- Increased Enjoyment : Encourages you to spend time outdoors, even during colder months, by creating a cozy atmosphere.
- Community Connection : Brightly decorated homes and gardens spread joy and foster a sense of community spirit.
- Easy Updates : These decorations can be swapped out or adjusted for different holidays or events, keeping your space fresh and exciting.
By thoughtfully combining festive lights and wreaths, you can turn your garden into a breathtaking winter wonderland that captures the magic of the season. Whether you’re aiming for a classic holiday theme or a modern twist, these timeless decorations will leave a lasting impression on everyone who visits your outdoor oasis.
Elevate Your Outdoor Space with Thoughtful Garden Décor
Transforming your garden into a stunning outdoor oasis is all about blending functionality, creativity, and personal style—and garden décor is the key to achieving this harmonious balance. From practical storage solutions and cozy seating areas to eye-catching accents like wind chimes, trellises, and painted rocks, every element you add has the power to enhance both the beauty and usability of your space. Whether you’re crafting a serene retreat, a vibrant entertainment hub, or a whimsical wonderland, thoughtful garden décor allows you to express your personality while creating an environment that invites relaxation, connection, and joy.
The beauty of garden décor lies in its versatility. You can upcycle old furniture for a sustainable touch, install solar-powered lights for eco-friendly illumination, or arrange seasonal flower beds to celebrate the changing rhythms of nature. With a mix of DIY projects and carefully chosen pieces, even the simplest backyard can become a sanctuary that reflects your unique tastes and needs. And let’s not forget the magic of festive lights and wreaths during winter or the charm of bright cushions and umbrellas in summer—these small yet impactful details ensure your garden remains a year-round haven.
Ultimately, garden décor is more than just embellishment; it’s an opportunity to connect with your outdoor space and make it truly yours. So, whether you’re starting with a blank canvas or refreshing an existing design, take inspiration from these ideas and let your creativity shine. After all, a well-decorated garden isn’t just a feast for the eyes—it’s a place where memories are made, seasons are celebrated, and life feels just a little bit brighter.